Virtualbox Could Not Read From Boot Medium Windows 98
Dwelling » Articles » 12c » Here
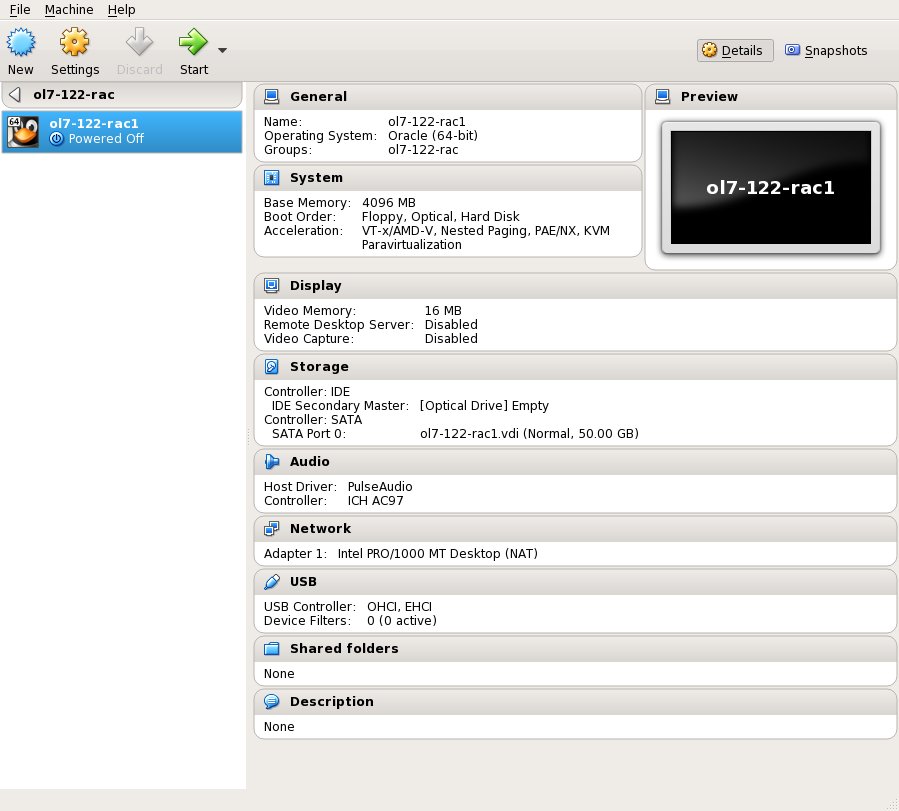
Oracle Database 12c Release 2 (12.ii) RAC On Oracle Linux 7 Using VirtualBox
This commodity describes the installation of Oracle Database 12c Release 2 (12.2 64-bit) RAC on Linux (Oracle Linux 7 64-bit) using VirtualBox (5.1) with no additional shared deejay devices.
- TL;DR
- Introduction
- Download Software
- VirtualBox Installation
- VirtualBox Network Setup
- Virtual Machine Setup
- Guest Operating System Installation
- Oracle Installation Prerequisites
- Automated Setup
- Manual Setup
- Boosted Setup
- Install Invitee Additions
- Create Shared Disks
- Clone the Virtual Machine
- Install the Filigree Infrastructure
- Install the Database Software
- Create a Database
- Check the Status of the RAC
Related manufactures.
- All RAC Articles
- Oracle Database 12c Release ii (12.two) RAC On Oracle Linux 6 Using VirtualBox
TL;DR
If you are comfortable with VirtualBox, Vagrant and RAC you might want to leap straight to the GitHub repository and utilise the basic instructions here, rather than working through a transmission build.
Introduction
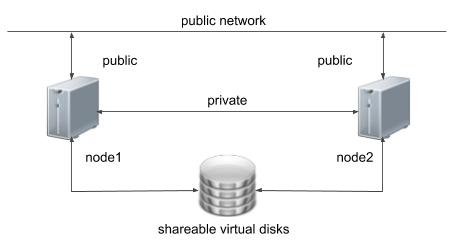
Ane of the biggest obstacles preventing people from setting upward examination RAC environments is the requirement for shared storage. In a production environment, shared storage is often provided past a SAN or loftier-end NAS device, merely both of these options are very expensive when all you want to exercise is get some experience installing and using RAC. A cheaper alternative is to utilise virtualization to fake the shared storage.
Using VirtualBox you can run multiple Virtual Machines (VMs) on a single server, allowing you to run both RAC nodes on a unmarried auto. In addition, it allows you to set up shared virtual disks, overcoming the obstacle of expensive shared storage.
Before you launch into this installation, here are a few things to consider.
- The finished system includes the host operating organization, two invitee operating systems, ii sets of Oracle Grid Infrastructure (Clusterware + ASM) and two Database instances all on a unmarried server. Equally you tin imagine, this requires a significant amount of disk space, CPU and memory.
- Post-obit on from the last point, the VMs volition each need at least 4G of RAM, preferably more if yous don't desire the VMs to bandy like crazy. Don't assume you will be able to run this on a small-scale PC or laptop. You won't.
- This procedure provides a bare basic installation to get the RAC working. At that place is no redundancy in the Grid Infrastructure installation or the ASM installation. To add this, simply create double the amount of shared disks and select the "Normal" redundancy choice when it is offered. Of course, this will take more disk space.
- During the virtual deejay creation, I always choose non to preallocate the deejay space. This makes virtual deejay access slower during the installation, simply saves on wasted disk space. The shared disks must have their space preallocated.
- This is not, and should not be considered, a production-ready system. It'south simply to allow you to get used to installing and using RAC.
- The Unmarried Client Access Name (Browse) should be defined in the DNS or GNS and round-robin between one of 3 addresses, which are on the same subnet as the public and virtual IPs. Prior to 11.2.0.2 it could exist defined as a single IP address in the "/etc/hosts" file, which is wrong and will cause the cluster verification to fail, but information technology allowed you to complete the install without the presence of a DNS. This does not seem to work for xi.2.0.2 onward.
- The virtual machines tin can be limited to 2Gig of swap, which causes a prerequisite check failure, but doesn't prevent the installation working. If you want to avoid this, define 3+Gig of swap.
- This commodity uses the 64-flake versions of Oracle Linux and Oracle 12c Release 2.
- When doing this installation on my server, I split the virtual disks on to dissimilar concrete disks ("/u02", "/u03", "/u04"). This is not necessary, but makes things run a chip faster.
This procedure should run successfully on a Linux and Windows host. Where applicative, I've included both the Linux and Windows commands to be run on the host, then selection the relevant ones.
Although I have completed this installation with 4G VMs, it was chronically slow. I would propose using as much retentivity as possible, without making the host OS bandy.
Download Software
Download the following software.
- Oracle Linux vii (Use the latest spin eg. 7.3)
- VirtualBox (5.1.14)
- Oracle 12c Release two (12.2.0.1) Software (64 fleck)
Depending on your version of VirtualBox and Oracle Linux, in that location may be some slight variation in how the screen shots look.
VirtualBox Installation
Beginning, install the VirtualBox software. On RHEL and its clones you do this with the following blazon of control as the root user. On windows, just run the ".exe".
# rpm -Uvh VirtualBox*.rpm
The packet proper name volition vary depending on the host distribution y'all are using. Once complete, VirtualBox is started from the menu.
VirtualBox Network Setup
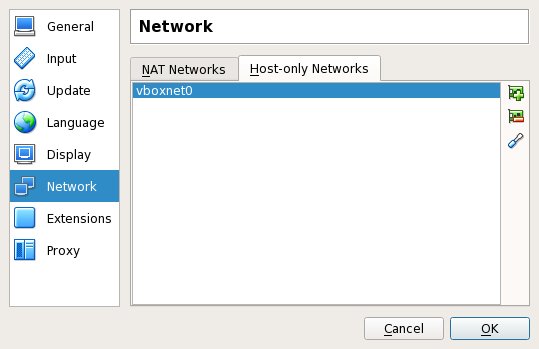
We demand to make sure a host-simply network is configured and check/modify the IP range for that network. This will be the public network for our RAC installation.
-
Start VirtualBox from the carte.
-
Select the "File > Preferences" bill of fare option.
-
Click "Network" in the left pane and click the "Host-simply Networks" tab.
-
Click the "Adds new host-just network" push on the right size of the screen. Depending on the host Bone, a network chosen "vboxnet0" or "VirtualBox Host-Simply Ethernet Adapter" volition be created.
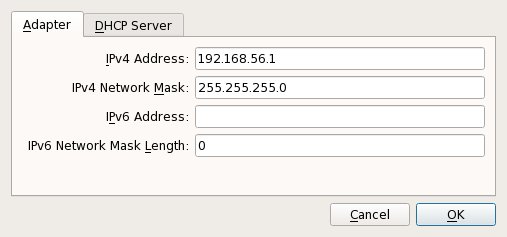
Click the "Edits selected host-merely network." button on the right size of the screen.
-
If you want to use a different subnet for your public addresses y'all can modify the network details here. Just make sure the subnet you choose doesn't match any real subnets on your network. I've decided to stick with the default, which for me is "192.168.56.X".
- Utilise the "OK" buttons to get out out of this screen.
- Click the "NAT Networks" tab. If you don't accept a NAT network defined, click the "+" button. You shouldn't need to configure this.
- Click the "OK" button to close the preferences dialog.
Virtual Automobile Setup
Now we must define the two virtual RAC nodes. We tin can save time by defining ane VM, so cloning it when it is installed.
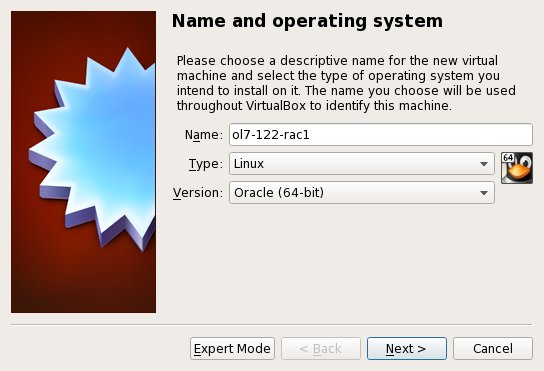
Beginning VirtualBox and click the "New" push on the toolbar. Enter the proper noun "ol7-122-rac1", OS "Linux" and Version "Oracle (64 flake)", and so click the "Next" push button.
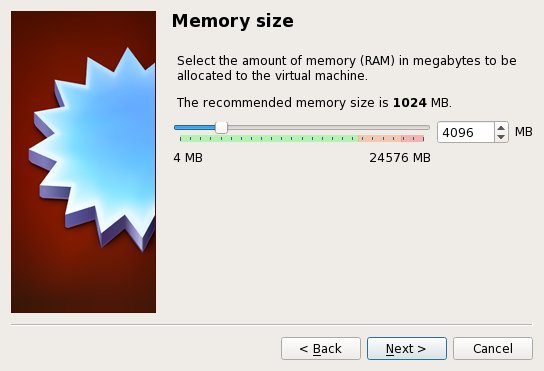
Enter "4096" equally the base memory size, then click the "Adjacent" push button. Use more retention if you have enough physical retentiveness on your machine every bit information technology will brand the process much quicker!
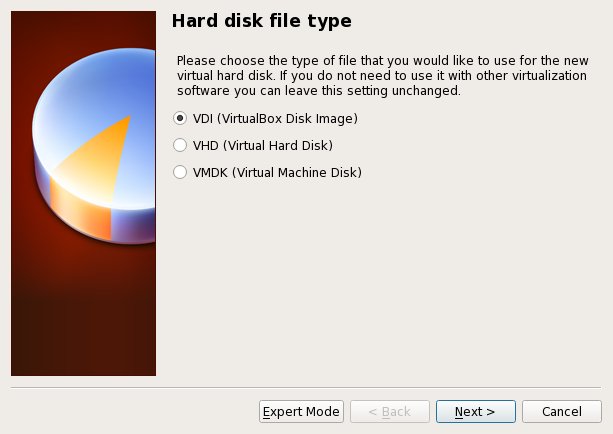
Accept the default option to create a new virtual hard disk by clicking the "Create" button.

Acccept the default difficult drive file type by clicking the "Next" push.
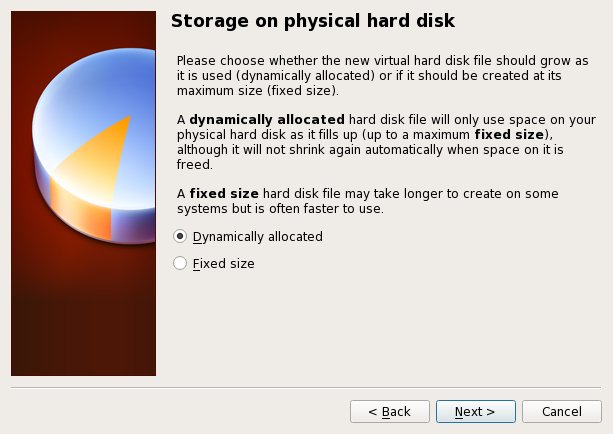
Acccept the "Dynamically allocated" option by clicking the "Side by side" button.
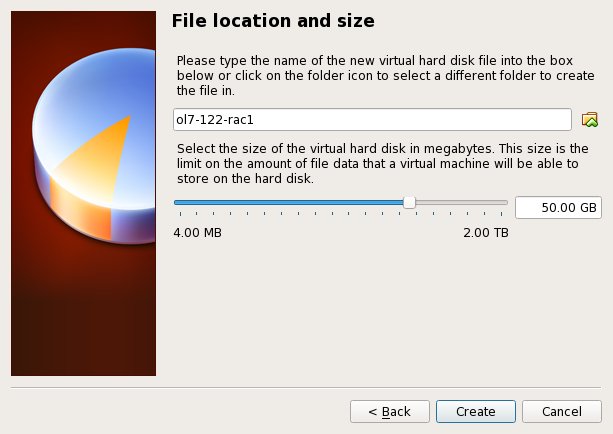
Accept the default location and set the size to "50G", then click the "Create" push button. If yous tin spread the virtual disks onto unlike physical disks, that will improve operation.
The "ol7-122-rac1" VM will announced on the left hand pane. Scroll downwardly the details on the right and click on the "Network" link.
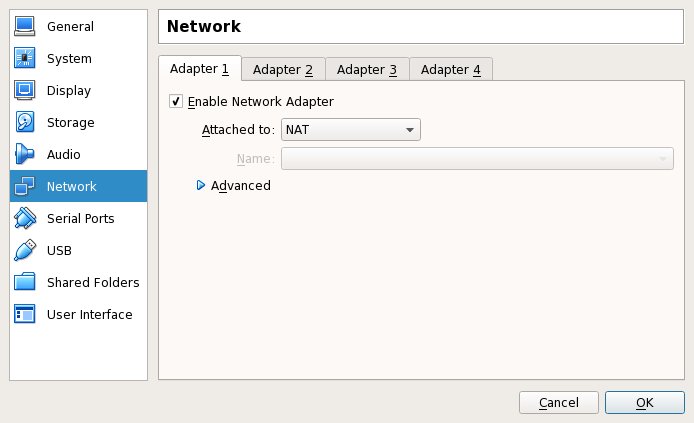
Brand sure "Adapter 1" is enabled, set to "NAT", and so click on the "Adapter 2" tab.
Make sure "Adapter ii" is enabled, set to "Host-only Adapter", then click on the "Adapter 3" tab.

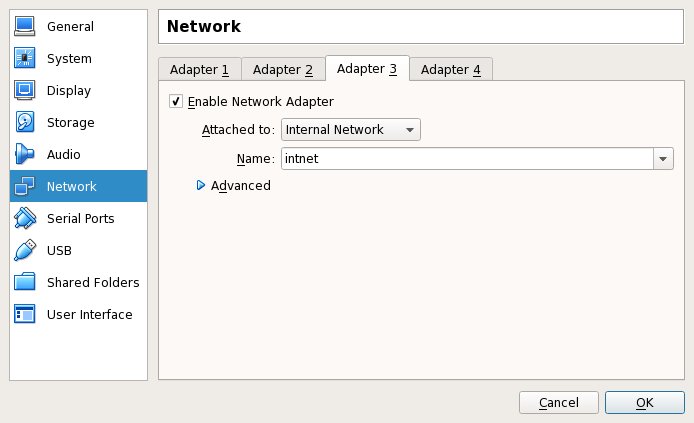
Brand sure "Adapter iii" is enabled, prepare to "Internal Network", and then click on the "System" section.
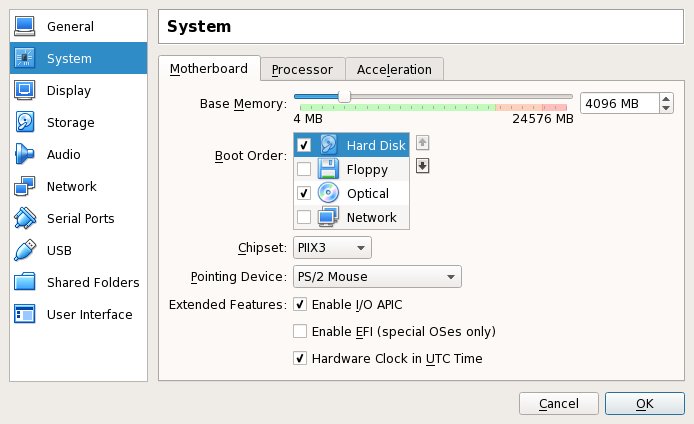
Motility "Hard Disk" to the top of the kick order and uncheck the "Floppy" pick, and then click the "OK" button.
The virtual machine is now configured so we can start the guest operating system installation.
Guest Operating System Installation
With the new VM highlighted, click the "Start" push on the toolbar. On the "Select starting time-upward disk" screen, choose the relevant Oracle Linux ISO epitome and click the "Start" push button.
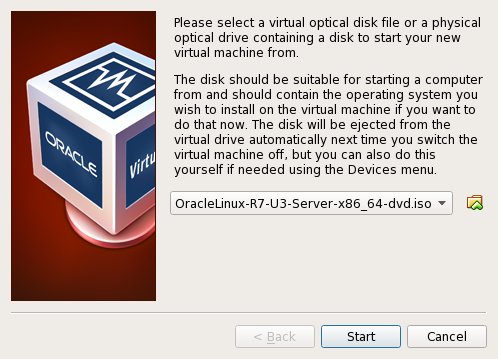
If a "Select start-upwards disk" screen doesn't appear, use the "Devices > Optical Drives > Cull disk epitome..." menu option to select the relevant ISO image, then restart the VM using the "Machine > Reset" menu pick.
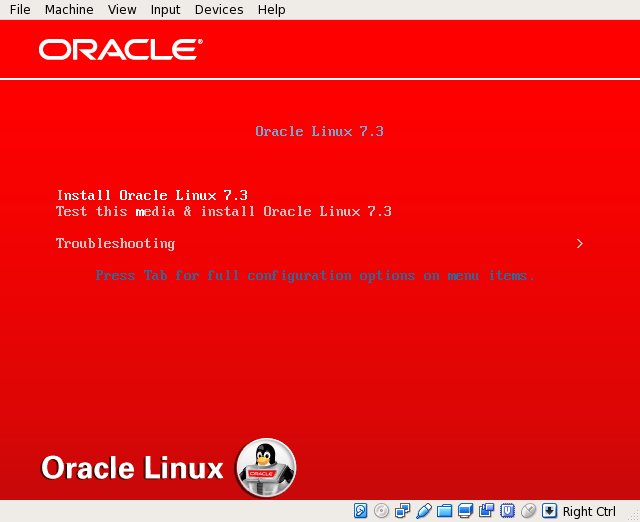
The resulting console window volition incorporate the Oracle Linux kicking screen.
Continue through the Oracle Linux 7 installation as y'all would for a basic server. A general pictorial guide to the installation can be establish here. More specifically, information technology should be a server installation with a minimum of 4G+ swap, firewall disabled, SELinux set to permissive and the following package groups installed:
- Server with GUI
- Hardware Monitoring Utilities
- Big Systems Performance
- Network file system client
- Performance Tools
- Compatibility Libraries
- Development Tools
To be consequent with the balance of the article, the following data should be set during the installation.
- hostname: ol7-122-rac1.localdomain
- enp0s3 (eth0): DHCP (Connect Automatically)
- enp0s8 (eth1): IP=192.168.56.101, Subnet=255.255.255.0, Gateway=192.168.56.one, DNS=192.168.56.1, Search=localdomain (Connect Automatically)
- enp0s9 (eth2): IP=192.168.i.101, Subnet=255.255.255.0, Gateway=<blank>, DNS=<blank>, Search=<blank> (Connect Automatically)
You are free to change the IP addresses to adjust your network, only recollect to stay consistent with those adjustments throughout the rest of the article. Likewise, in this commodity I will refer to the network adapters as enp0s3, enp0s8 and enp0s9, In previous Linux versions they would have been eth0, eth1 and eth2 respectively.
Oracle Installation Prerequisites
Perform either the Automatic Setup or the Manual Setup to complete the basic prerequisites. The Additional Setup is required for all installations.
Automated Setup
If you plan to apply the "oracle-database-server-12cR2-preinstall" bundle to perform all your prerequisite setup, issue the post-obit command.
# yum install oracle-database-server-12cR2-preinstall -y
Before versions of Oracle Linux required manual setup of the Yum repository by following the instructions at http://public-yum.oracle.com.
It is probably worth doing a total update also, but this is not strictly speaking necessary.
# yum update -y
Manual Setup
If you have not used the "oracle-database-server-12cR2-preinstall" packet to perform all prerequisites, y'all will need to manually perform the following setup tasks.
Add the post-obit lines to the "/etc/sysctl.conf" file, or in a file chosen "/etc/sysctl.d/98-oracle.conf".
fs.file-max = 6815744 kernel.sem = 250 32000 100 128 kernel.shmmni = 4096 kernel.shmall = 1073741824 kernel.shmmax = 4398046511104 kernel.panic_on_oops = ane net.core.rmem_default = 262144 internet.core.rmem_max = 4194304 internet.core.wmem_default = 262144 net.cadre.wmem_max = 1048576 cyberspace.ipv4.conf.all.rp_filter = 2 cyberspace.ipv4.conf.default.rp_filter = two fs.aio-max-nr = 1048576 net.ipv4.ip_local_port_range = 9000 65500
Run one of the post-obit commands to change the current kernel parameters, depending on which file yous edited.
/sbin/sysctl -p # Or /sbin/sysctl -p /etc/sysctl.d/98-oracle.conf
Add the following lines to a file called "/etc/security/limits.d/oracle-database-server-12cR2-preinstall.conf" file.
oracle soft nofile 1024 oracle hard nofile 65536 oracle soft nproc 16384 oracle hard nproc 16384 oracle soft stack 10240 oracle hard stack 32768 oracle hard memlock 134217728 oracle soft memlock 134217728
In add-on to the basic OS installation, the following packages must be installed whilst logged in as the root user. This includes the 64-scrap and 32-bit versions of some packages.
# From Public Yum or ULN yum install binutils -y yum install compat-libstdc++-33 -y yum install compat-libstdc++-33.i686 -y yum install gcc -y yum install gcc-c++ -y yum install glibc -y yum install glibc.i686 -y yum install glibc-devel -y yum install glibc-devel.i686 -y yum install ksh -y yum install libgcc -y yum install libgcc.i686 -y yum install libstdc++ -y yum install libstdc++.i686 -y yum install libstdc++-devel -y yum install libstdc++-devel.i686 -y yum install libaio -y yum install libaio.i686 -y yum install libaio-devel -y yum install libaio-devel.i686 -y yum install libXext -y yum install libXext.i686 -y yum install libXtst -y yum install libXtst.i686 -y yum install libX11 -y yum install libX11.i686 -y yum install libXau -y yum install libXau.i686 -y yum install libxcb -y yum install libxcb.i686 -y yum install libXi -y yum install libXi.i686 -y yum install brand -y yum install sysstat -y yum install unixODBC -y yum install unixODBC-devel -y yum install zlib-devel -y yum install zlib-devel.i686 -y
Create the new groups and users.
groupadd -g 54321 oinstall groupadd -g 54322 dba groupadd -grand 54323 oper #groupadd -g 54324 backupdba #groupadd -g 54325 dgdba #groupadd -k 54326 kmdba #groupadd -g 54327 asmdba #groupadd -g 54328 asmoper #groupadd -g 54329 asmadmin #groupadd -g 54330 racdba useradd -u 54321 -g oinstall -M dba,oper oracle
You could define the additional groups and assign them to the "oracle" users. The would allow you lot to assign the individual groups during the installation. For this installation I've merely used the "dba" group.
groupadd -1000 54324 backupdba groupadd -g 54325 dgdba groupadd -one thousand 54326 kmdba groupadd -thousand 54327 asmdba groupadd -g 54328 asmoper groupadd -g 54329 asmadmin groupadd -g 54330 racdba useradd -u 54321 -g oinstall -G dba,oper,backupdba,dgdba,kmdba,asmdba,asmoper,asmadmin,racdba oracle
Additional Setup
The following steps must be performed, whether you did the manual or automatic setup.
Perform the post-obit steps whilst logged into the "ol7-122-rac1" virtual machine as the root user.
Set the password for the "oracle" user.
passwd oracle
Autonomously grade the localhost address, the "/etc/hosts" file can exist left blank, merely I prefer to put the addresses in for reference.
127.0.0.1 localhost.localdomain localhost # Public 192.168.56.101 ol7-122-rac1.localdomain ol7-122-rac1 192.168.56.102 ol7-122-rac2.localdomain ol7-122-rac2 # Private 192.168.one.101 ol7-122-rac1-priv.localdomain ol7-122-rac1-priv 192.168.1.102 ol7-122-rac2-priv.localdomain ol7-122-rac2-priv # Virtual 192.168.56.103 ol7-122-rac1-vip.localdomain ol7-122-rac1-vip 192.168.56.104 ol7-122-rac2-vip.localdomain ol7-122-rac2-vip # Scan #192.168.56.105 ol7-122-scan.localdomain ol7-122-scan #192.168.56.106 ol7-122-scan.localdomain ol7-122-scan #192.168.56.107 ol7-122-scan.localdomain ol7-122-scan
The Scan address is commented out of the hosts file because it must be resolved using a DNS, and then it can round-robin betwixt 3 addresses on the same subnet every bit the public IPs. The DNS can be configured on the host motorcar using Demark or Dnsmasq, which is much simpler. If you are using Dnsmasq, put the RAC-specific entries in the hosts machines "/etc/hosts" file, with the SCAN entries uncommented, and restart Dnsmasq.
Make certain the "/etc/resolv.conf" file includes a nameserver entry that points to the correct nameserver. Too, if the "domain" and "search" entries are both present, comment out one of them. For this installation my "/etc/resolv.conf" looked similar this.
#domain localdomain search localdomain nameserver 192.168.56.ane
The changes to the "resolv.conf" will be overwritten by the network manager, due to the presence of the NAT interface. For this reason, this interface should now be disabled on startup. You can enable it manually if you demand to admission the internet from the VMs. Edit the "/etc/sysconfig/network-scripts/ifcfg-enp0s3" (eth0) file, making the following change. This will have effect subsequently the next restart.
ONBOOT=no
At that place is no need to do the restart now. Y'all can just run the following command. Retrieve to amend the adapter proper name if yours are named differently.
# ifdown enp0s3 # #ifdown eth0
At this indicate, the networking for the start node should look something like the following. Notice that enp0s3 (eth0) has no associated IP address because information technology is disabled.
# ifconfig enp0s3: flags=4163<Upwards,Broadcast,RUNNING,MULTICAST> mtu 1500 ether 08:00:27:f6:88:78 txqueuelen 1000 (Ethernet) RX packets 0 bytes 0 (0.0 B) RX errors 0 dropped 0 overruns 0 frame 0 TX packets 0 bytes 0 (0.0 B) TX errors 0 dropped 0 overruns 0 carrier 0 collisions 0 enp0s8: flags=4163<UP,Circulate,RUNNING,MULTICAST> mtu 1500 inet 192.168.56.101 netmask 255.255.255.0 broadcast 192.168.56.255 inet6 fe80::cf8d:317d:534:17d9 prefixlen 64 scopeid 0x20<link> ether 08:00:27:82:06:32 txqueuelen 1000 (Ethernet) RX packets 574 bytes 54444 (53.1 KiB) RX errors 0 dropped 0 overruns 0 frame 0 TX packets 547 bytes 71219 (69.5 KiB) TX errors 0 dropped 0 overruns 0 carrier 0 collisions 0 enp0s9: flags=4163<Up,BROADCAST,RUNNING,MULTICAST> mtu 1500 inet 192.168.1.101 netmask 255.255.255.0 circulate 192.168.ane.255 inet6 fe80::9a9a:f249:61d1:5447 prefixlen 64 scopeid 0x20<link> ether 08:00:27:2e:2c:cf txqueuelen 1000 (Ethernet) RX packets 0 bytes 0 (0.0 B) RX errors 0 dropped 0 overruns 0 frame 0 TX packets 29 bytes 4250 (4.one KiB) TX errors 0 dropped 0 overruns 0 carrier 0 collisions 0 lo: flags=73<Upwardly,LOOPBACK,RUNNING> mtu 65536 inet 127.0.0.1 netmask 255.0.0.0 inet6 ::1 prefixlen 128 scopeid 0x10<host> loop txqueuelen 0 (Local Loopback) RX packets 68 bytes 5780 (5.half-dozen KiB) RX errors 0 dropped 0 overruns 0 frame 0 TX packets 68 bytes 5780 (5.6 KiB) TX errors 0 dropped 0 overruns 0 carrier 0 collisions 0 virbr0: flags=4099<Upward,BROADCAST,MULTICAST> mtu 1500 inet 192.168.122.1 netmask 255.255.255.0 broadcast 192.168.122.255 ether 52:54:00:4a:12:2f txqueuelen 0 (Ethernet) RX packets 0 bytes 0 (0.0 B) RX errors 0 dropped 0 overruns 0 frame 0 TX packets 0 bytes 0 (0.0 B) TX errors 0 dropped 0 overruns 0 carrier 0 collisions 0 #
With this in identify and the DNS configured the SCAN address is beingness resolved to all three IP addresses.
# nslookup ol7-122-scan Server: 192.168.56.ane Accost: 192.168.56.1#53 Name: ol7-122-scan.localdomain Address: 192.168.56.105 Name: ol7-122-scan.localdomain Accost: 192.168.56.106 Name: ol7-122-scan.localdomain Accost: 192.168.56.107 #
Change the setting of SELinux to permissive by editing the "/etc/selinux/config" file, making certain the SELINUX flag is ready equally follows.
SELINUX=permissive
If yous have the Linux firewall enabled, you will need to disable or configure information technology, equally shown here or here. The following is an example of disabling the firewall.
# systemctl stop firewalld # systemctl disable firewalld
Make sure NTP (Chrony on OL7/RHEL7) is enabled.
# systemctl enable chronyd # systemctl restart chronyd # chronyc -a 'burst 4/4' # chronyc -a makestep
Create the directories in which the Oracle software will be installed.
mkdir -p /u01/app/12.2.0.1/grid mkdir -p /u01/app/oracle/product/12.2.0.1/db_1 chown -R oracle:oinstall /u01 chmod -R 775 /u01/
Log in as the "oracle" user and add together the post-obit lines at the end of the "/dwelling/oracle/.bash_profile" file.
# Oracle Settings export TMP=/tmp export TMPDIR=$TMP export ORACLE_HOSTNAME=ol7-122-rac1.localdomain export ORACLE_UNQNAME=CDBRAC export ORACLE_BASE=/u01/app/oracle consign GRID_HOME=/u01/app/12.ii.0.ane/filigree export DB_HOME=$ORACLE_BASE/production/12.two.0.1/db_1 consign ORACLE_HOME=$DB_HOME consign ORACLE_SID=cdbrac1 export ORACLE_TERM=xterm consign BASE_PATH=/usr/sbin:$PATH export PATH=$ORACLE_HOME/bin:$BASE_PATH export LD_LIBRARY_PATH=$ORACLE_HOME/lib:/lib:/usr/lib export CLASSPATH=$ORACLE_HOME/JRE:$ORACLE_HOME/jlib:$ORACLE_HOME/rdbms/jlib allonym grid_env='. /home/oracle/grid_env' alias db_env='. /dwelling/oracle/db_env'
Create a file called "/home/oracle/grid_env" with the post-obit contents.
export ORACLE_SID=+ASM1 export ORACLE_HOME=$GRID_HOME export PATH=$ORACLE_HOME/bin:$BASE_PATH consign LD_LIBRARY_PATH=$ORACLE_HOME/lib:/lib:/usr/lib consign CLASSPATH=$ORACLE_HOME/JRE:$ORACLE_HOME/jlib:$ORACLE_HOME/rdbms/jlib
Create a file called "/home/oracle/db_env" with the following contents.
export ORACLE_SID=cdbrac1 consign ORACLE_HOME=$DB_HOME export PATH=$ORACLE_HOME/bin:$BASE_PATH export LD_LIBRARY_PATH=$ORACLE_HOME/lib:/lib:/usr/lib export CLASSPATH=$ORACLE_HOME/JRE:$ORACLE_HOME/jlib:$ORACLE_HOME/rdbms/jlib
Once the "/home/oracle/.bash_profile" has been run, yous will be able to switch between environments as follows.
$ grid_env $ echo $ORACLE_HOME /u01/app/12.ii.0.1/grid $ db_env $ repeat $ORACLE_HOME /u01/app/oracle/product/12.2.0.one/db_1 $
We've fabricated a lot of changes, so it's worth doing a reboot of the VM at this signal to brand sure all the changes take taken effect.
# shutdown -r now
Install Guest Additions
Click on the "Devices > Install Invitee Additions" bill of fare option at the elevation of the VM screen. If you get the selection to auto-run have information technology. If not, then run the following commands.
cd /media/VBOXADDITIONS* sh ./VBoxLinuxAdditions.run
Add the "oracle" user into the "vboxsf" grouping so information technology has access to shared drives.
# usermod -G oinstall,dba,vboxsf oracle # id oracle uid=54321(oracle) gid=54321(oinstall) groups=54321(oinstall),54322(dba),54323(vboxsf) #
Unzip the database software (but not the grid software) on the host machine.
unzip linuxx64_12201_database.nix
Create a shared binder (Devices > Shared Folders) on the virtual machine, pointing to the directory on the host where the Oracle software was unzipped. Cheque the "Auto-mount" and "Make Permanent" options before clicking the "OK" push.
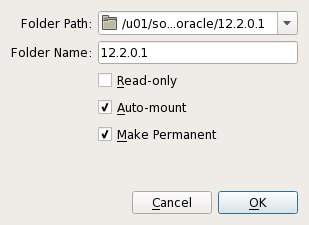
The VM will need to be restarted for the guest additions to be used properly. The next section requires a shutdown and then no additional restart is needed at this time. Once the VM is restarted, the shared folder called "/media/sf_12.2.0.one" volition be accessible by the "oracle" user.
Create Shared Disks
Shut down the "ol7-122-rac1" virtual motorcar using the following control.
# shutdown -h now
On the host server, create 4 sharable virtual disks and associate them every bit virtual media using the post-obit commands. You can pick a unlike location, simply brand sure they are outside the existing VM directory.
$ mkdir -p /u04/VirtualBox/ol7-122-rac $ cd /u04/VirtualBox/ol7-122-rac $ $ # Create the disks and associate them with VirtualBox equally virtual media. $ VBoxManage createhd --filename asm1.vdi --size 20480 --format VDI --variant Fixed $ VBoxManage createhd --filename asm2.vdi --size 20480 --format VDI --variant Stock-still $ VBoxManage createhd --filename asm3.vdi --size 20480 --format VDI --variant Fixed $ VBoxManage createhd --filename asm4.vdi --size 20480 --format VDI --variant Stock-still $ $ # Connect them to the VM. $ VBoxManage storageattach ol7-122-rac1 --storagectl "SATA" --port 1 --device 0 --type hdd --medium asm1.vdi --mtype shareable $ VBoxManage storageattach ol7-122-rac1 --storagectl "SATA" --port ii --device 0 --type hdd --medium asm2.vdi --mtype shareable $ VBoxManage storageattach ol7-122-rac1 --storagectl "SATA" --port three --device 0 --type hdd --medium asm3.vdi --mtype shareable $ VBoxManage storageattach ol7-122-rac1 --storagectl "SATA" --port 4 --device 0 --type hdd --medium asm4.vdi --mtype shareable $ $ # Brand shareable. $ VBoxManage modifyhd asm1.vdi --type shareable $ VBoxManage modifyhd asm2.vdi --type shareable $ VBoxManage modifyhd asm3.vdi --type shareable $ VBoxManage modifyhd asm4.vdi --type shareable
If yous are using a Windows host, you will have to modify the paths, but the process is the same.
C: mkdir C:\VirtualBox\ol7-122-rac cd C:\VirtualBox\ol7-122-rac "c:\Plan Files\Oracle\VirtualBox\VBoxManage" createhd --filename asm1.vdi --size 20480 --format VDI --variant Fixed "c:\Program Files\Oracle\VirtualBox\VBoxManage" createhd --filename asm2.vdi --size 20480 --format VDI --variant Fixed "c:\Programme Files\Oracle\VirtualBox\VBoxManage" createhd --filename asm3.vdi --size 20480 --format VDI --variant Stock-still "c:\Plan Files\Oracle\VirtualBox\VBoxManage" createhd --filename asm4.vdi --size 20480 --format VDI --variant Fixed "c:\Program Files\Oracle\VirtualBox\VBoxManage" storageattach ol7-122-rac1 --storagectl "SATA" --port 1 --device 0 --type hdd --medium asm1.vdi --mtype shareable "c:\Program Files\Oracle\VirtualBox\VBoxManage" storageattach ol7-122-rac1 --storagectl "SATA" --port two --device 0 --blazon hdd --medium asm2.vdi --mtype shareable "c:\Program Files\Oracle\VirtualBox\VBoxManage" storageattach ol7-122-rac1 --storagectl "SATA" --port iii --device 0 --blazon hdd --medium asm3.vdi --mtype shareable "c:\Program Files\Oracle\VirtualBox\VBoxManage" storageattach ol7-122-rac1 --storagectl "SATA" --port 4 --device 0 --type hdd --medium asm4.vdi --mtype shareable "c:\Program Files\Oracle\VirtualBox\VBoxManage" modifyhd asm1.vdi --blazon shareable "c:\Plan Files\Oracle\VirtualBox\VBoxManage" modifyhd asm2.vdi --type shareable "c:\Program Files\Oracle\VirtualBox\VBoxManage" modifyhd asm3.vdi --type shareable "c:\Program Files\Oracle\VirtualBox\VBoxManage" modifyhd asm4.vdi --blazon shareable
Start the "ol7-122-rac1" virtual car by clicking the "Start" button on the toolbar. When the server has started, log in as the root user then yous tin configure the shared disks. The electric current disks tin exist seen past issuing the following commands.
# cd /dev # ls sd* sda sda1 sda2 sdb sdc sdd sde #
Use the "fdisk" command to sectionalization the disks sdb to sde. The following output shows the expected fdisk output for the sdb disk.
# fdisk /dev/sdb Welcome to fdisk (util-linux two.23.two). Changes volition remain in retentiveness just, until you decide to write them. Be conscientious before using the write command. Device does not contain a recognized division table Building a new DOS disklabel with disk identifier 0x14a4629c. Command (m for help): n Partition type: p primary (0 chief, 0 extended, 4 free) due east extended Select (default p): p Partition number (1-4, default i): First sector (2048-41943039, default 2048): Using default value 2048 Concluding sector, +sectors or +size{K,Yard,Thou} (2048-41943039, default 41943039): Using default value 41943039 Partition one of type Linux and of size twenty GiB is set Command (m for help): w The partition table has been contradistinct! Calling ioctl() to re-read partition table. Syncing disks. # In each example, the sequence of answers is "northward", "p", "1", "Return", "Return" and "w".
One time all the disks are partitioned, the results can be seen by repeating the previous "ls" control.
# cd /dev # ls sd* sda sda1 sda2 sdb sdb1 sdc sdc1 sdd sdd1 sde sde1 #
Configure your UDEV rules, as shown hither.
Add the following to the "/etc/scsi_id.config" file to configure SCSI devices as trusted. Create the file if it doesn't already exist.
options=-grand
The SCSI ID of my disks are displayed below.
# /usr/lib/udev/scsi_id -g -u -d /dev/sdb1 1ATA_VBOX_HARDDISK_VB189c7a69-689f61b0 # /usr/lib/udev/scsi_id -g -u -d /dev/sdc1 1ATA_VBOX_HARDDISK_VBc4ae174e-fc756d12 # /usr/lib/udev/scsi_id -g -u -d /dev/sdd1 1ATA_VBOX_HARDDISK_VBa4e03079-ae751cbd # /usr/lib/udev/scsi_id -m -u -d /dev/sde1 1ATA_VBOX_HARDDISK_VBf00747dc-10252f06 #
Using these values, edit the "/etc/udev/rules.d/99-oracle-asmdevices.rules" file adding the following four entries. All parameters for a single entry must be on the same line.
KERNEL=="sd?ane", SUBSYSTEM=="block", PROGRAM=="/usr/lib/udev/scsi_id -1000 -u -d /dev/$parent", Consequence=="1ATA_VBOX_HARDDISK_VB189c7a69-689f61b0", SYMLINK+="oracleasm/asm-disk1", OWNER="oracle", Group="dba", Fashion="0660" KERNEL=="sd?one", SUBSYSTEM=="block", PROGRAM=="/usr/lib/udev/scsi_id -chiliad -u -d /dev/$parent", RESULT=="1ATA_VBOX_HARDDISK_VBc4ae174e-fc756d12", SYMLINK+="oracleasm/asm-disk2", OWNER="oracle", GROUP="dba", Way="0660" KERNEL=="sd?ane", SUBSYSTEM=="block", Program=="/usr/lib/udev/scsi_id -m -u -d /dev/$parent", RESULT=="1ATA_VBOX_HARDDISK_VBa4e03079-ae751cbd", SYMLINK+="oracleasm/asm-disk3", OWNER="oracle", Grouping="dba", MODE="0660" KERNEL=="sd?ane", SUBSYSTEM=="block", Program=="/usr/lib/udev/scsi_id -1000 -u -d /dev/$parent", RESULT=="1ATA_VBOX_HARDDISK_VBf00747dc-10252f06", SYMLINK+="oracleasm/asm-disk4", Possessor="oracle", GROUP="dba", MODE="0660"
Load updated block device division tables.
# /sbin/partprobe /dev/sdb1 # /sbin/partprobe /dev/sdc1 # /sbin/partprobe /dev/sdd1 # /sbin/partprobe /dev/sde1
Test the rules are working as expected.
# /sbin/udevadm test /block/sdb/sdb1
Reload the UDEV rules.
# /sbin/udevadm command --reload-rules
The disks should now be visible and have the correct ownership using the following command. If they are not visible, your UDEV configuration is incorrect and must be fixed before you lot proceed.
# ls -al /dev/oracleasm/* lrwxrwxrwx. ane root root 7 Mar 6 17:41 /dev/oracleasm/asm-disk1 -> ../sdb1 lrwxrwxrwx. 1 root root seven Mar half-dozen 17:41 /dev/oracleasm/asm-disk2 -> ../sdc1 lrwxrwxrwx. 1 root root 7 Mar 6 17:41 /dev/oracleasm/asm-disk3 -> ../sdd1 lrwxrwxrwx. one root root 7 Mar 6 17:41 /dev/oracleasm/asm-disk4 -> ../sde1 #
The symbolic links are endemic by root, just the devices they point to at present accept the right ownership.
# ls -al /dev/sd*1 brw-rw----. i root deejay 8, 1 Apr 25 xiv:xi /dev/sda1 brw-rw----. 1 oracle dba 8, 17 April 25 fourteen:eleven /dev/sdb1 brw-rw----. 1 oracle dba viii, 33 Apr 25 14:11 /dev/sdc1 brw-rw----. one oracle dba 8, 49 Apr 25 fourteen:eleven /dev/sdd1 brw-rw----. 1 oracle dba 8, 65 Apr 25 14:11 /dev/sde1 #
The shared disks are now configured for the grid infrastructure.
Clone the Virtual Machine
Practise not apply VirtualBox to clone VM, equally it will likewise attempt to clone the shared disks, which is non what nosotros want. Instead we must manually clone the VM.
Shut downwardly the "ol7-122-rac1" virtual automobile using the following command.
# shutdown -h now
Yous may get errors if you create the virtual disk in the default location VirtualBox will apply to create the VM. If that happens, rename the folder holding the new virtual deejay and get through the creation process of the new VM again.
Manually clone the "ol7-122-rac1.vdi" disk using the post-obit commands on the host server.
$ # Linux $ mkdir -p /u03/VirtualBox/ol7-122-rac2 $ VBoxManage clonehd /u01/VirtualBox/ol7-122-rac1/ol7-122-rac1.vdi /u03/VirtualBox/ol7-122-rac2/ol7-122-rac2.vdi Rem Windows mkdir "C:\VirtualBox\ol7-122-rac2" "c:\Programme Files\Oracle\VirtualBox\VBoxManage" clonehd "C:\VirtualBox\ol7-122-rac1\ol7-122-rac1.vdi" "C:\VirtualBox\ol7-122-rac2\ol7-122-rac2.vdi"
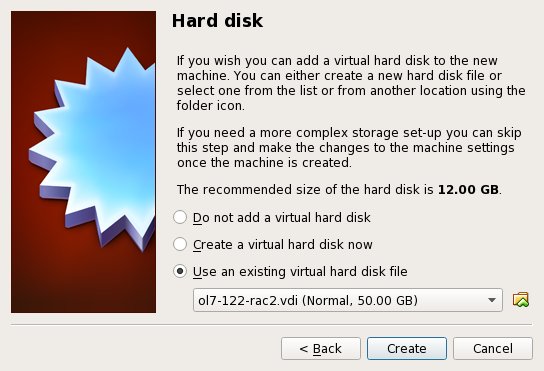
Create the "ol7-122-rac2" virtual machine in VirtualBox in the same fashion equally y'all did for "ol7-122-rac1", with the exception of using an existing "ol7-122-rac2.vdi" virtual difficult drive.
Call back to add the three network adaptor as you lot did on the "ol7-122-rac1" VM. When the VM is created, adhere the shared disks to this VM.
$ # Linux : Switch to the shared storage location and attach them. $ cd /u04/VirtualBox/ol7-122-rac $ $ VBoxManage storageattach ol7-122-rac2 --storagectl "SATA" --port 1 --device 0 --blazon hdd --medium asm1.vdi --mtype shareable $ VBoxManage storageattach ol7-122-rac2 --storagectl "SATA" --port 2 --device 0 --type hdd --medium asm2.vdi --mtype shareable $ VBoxManage storageattach ol7-122-rac2 --storagectl "SATA" --port three --device 0 --blazon hdd --medium asm3.vdi --mtype shareable $ VBoxManage storageattach ol7-122-rac2 --storagectl "SATA" --port 4 --device 0 --type hdd --medium asm4.vdi --mtype shareable Rem Windows : Switch to the shared storage location and attach them. C: cd C:\VirtualBox\ol7-122-rac "c:\Programme Files\Oracle\VirtualBox\VBoxManage" storageattach ol7-122-rac2 --storagectl "SATA" --port one --device 0 --type hdd --medium asm1.vdi --mtype shareable "c:\Plan Files\Oracle\VirtualBox\VBoxManage" storageattach ol7-122-rac2 --storagectl "SATA" --port ii --device 0 --type hdd --medium asm2.vdi --mtype shareable "c:\Program Files\Oracle\VirtualBox\VBoxManage" storageattach ol7-122-rac2 --storagectl "SATA" --port 3 --device 0 --type hdd --medium asm3.vdi --mtype shareable "c:\Plan Files\Oracle\VirtualBox\VBoxManage" storageattach ol7-122-rac2 --storagectl "SATA" --port 4 --device 0 --type hdd --medium asm4.vdi --mtype shareable
Start the "ol7-122-rac2" virtual automobile by clicking the "First" button on the toolbar. Ignore any network errors during the startup.
Log in to the "ol7-122-rac2" virtual machine as the "root" user and then we tin can reconfigure the network settings to friction match the following.
- hostname: ol7-122-rac2.localdomain
- enp0s3 (eth0): DHCP (*Not* Connect Automatically)
- enp0s8 (eth1): IP=192.168.56.102, Subnet=255.255.255.0, Gateway=192.168.56.1, DNS=192.168.56.one, Search=localdomain (Connect Automatically)
- enp0s9 (eth2): IP=192.168.1.102, Subnet=255.255.255.0, Gateway=<blank>, DNS=<blank>, Search=<blank> (Connect Automatically)
Amend the hostname in the "/etc/hostname" file.
ol7-122-rac2.localdomain
Different previous Linux versions, we shouldn't accept to edit the MAC accost associated with the network adapters, only we will have to change their IP addresses.
Edit the "/etc/sysconfig/network-scripts/ifcfg-enp0s8" (eth1), amending just the IPADDR settings as follows and deleting the UUID entry.
IPADDR=192.168.56.102
Edit the "/etc/sysconfig/network-scripts/ifcfg-enp0s9" (eth2), amending simply the IPADDR settings as follows and deleting the UUID entry.
IPADDR=192.168.one.102
Restart the virtual machines.
# shutdown -r now
At this point, the networking for the second node should expect something like the post-obit. Notice that enp0s3 (eth0) has no associated IP address because information technology is disabled.
# ifconfig enp0s3 : flags=4163<Up,BROADCAST,RUNNING,MULTICAST> mtu 1500 ether 08:00:27:dc:7c:74 txqueuelen 1000 (Ethernet) RX packets 0 bytes 0 (0.0 B) RX errors 0 dropped 0 overruns 0 frame 0 TX packets 0 bytes 0 (0.0 B) TX errors 0 dropped 0 overruns 0 carrier 0 collisions 0 enp0s8: flags=4163<Up,BROADCAST,RUNNING,MULTICAST> mtu 1500 inet 192.168.56.102 netmask 255.255.255.0 broadcast 192.168.56.255 inet6 fe80::a00:27ff:fed9:c89a prefixlen 64 scopeid 0x20<link> ether 08:00:27:d9:c8:9a txqueuelen thou (Ethernet) RX packets 197 bytes 19460 (nineteen.0 KiB) RX errors 0 dropped 0 overruns 0 frame 0 TX packets 178 bytes 27171 (26.5 KiB) TX errors 0 dropped 0 overruns 0 carrier 0 collisions 0 enp0s9: flags=4163<Upwardly,BROADCAST,RUNNING,MULTICAST> mtu 1500 inet 192.168.ane.102 netmask 255.255.255.0 broadcast 192.168.1.255 inet6 fe80::a00:27ff:feb4:6bf prefixlen 64 scopeid 0x20<link> ether 08:00:27:b4:06:bf txqueuelen 1000 (Ethernet) RX packets 0 bytes 0 (0.0 B) RX errors 0 dropped 0 overruns 0 frame 0 TX packets 30 bytes 4112 (iv.0 KiB) TX errors 0 dropped 0 overruns 0 carrier 0 collisions 0 lo: flags=73<Upwards,LOOPBACK,RUNNING> mtu 65536 inet 127.0.0.i netmask 255.0.0.0 inet6 ::1 prefixlen 128 scopeid 0x10<host> loop txqueuelen 0 (Local Loopback) RX packets 4 bytes 420 (420.0 B) RX errors 0 dropped 0 overruns 0 frame 0 TX packets 4 bytes 420 (420.0 B) TX errors 0 dropped 0 overruns 0 carrier 0 collisions 0 #
Edit the "/home/oracle/.bash_profile" file on the "ol7-122-rac2" node to right the ORACLE_SID and ORACLE_HOSTNAME values.
export ORACLE_SID=cdbrac2 consign ORACLE_HOSTNAME=ol7-122-rac2.localdomain
Besides, amend the ORACLE_SID setting in the "/home/oracle/db_env" and "/dwelling/oracle/grid_env" files.
Restart the "ol7-122-rac2" virtual machine and start the "ol7-122-rac1" virtual auto. When both nodes have started, bank check they can both ping all the public and private IP addresses using the following commands.
ping -c 3 ol7-122-rac1 ping -c 3 ol7-122-rac1-priv ping -c iii ol7-122-rac2 ping -c three ol7-122-rac2-priv
Bank check the Scan address is still being resolved properly on both nodes.
# nslookup ol7-122-browse Server: 192.168.56.1 Accost: 192.168.56.1#53 Proper name: ol7-122-scan.localdomain Address: 192.168.56.105 Proper noun: ol7-122-scan.localdomain Address: 192.168.56.106 Name: ol7-122-browse.localdomain Address: 192.168.56.107 #
At this point the virtual IP addresses divers in the "/etc/hosts" file volition not work, so don't bother testing them.
Bank check the UDEV rules are working on both machines.
# ls -al /dev/oracleasm/* lrwxrwxrwx. ane root root 7 Sep 18 08:nineteen /dev/oracleasm/asm-disk1 -> ../sdb1 lrwxrwxrwx. 1 root root 7 Sep eighteen 08:19 /dev/oracleasm/asm-disk2 -> ../sdc1 lrwxrwxrwx. one root root seven Sep 18 08:19 /dev/oracleasm/asm-disk3 -> ../sdd1 lrwxrwxrwx. 1 root root 7 Sep 18 08:19 /dev/oracleasm/asm-disk4 -> ../sde1 #
Prior to 11gR2 we would probably apply the "runcluvfy.sh" utility in the clusterware root directory to check the prerequisites have been met. If you are intending to configure SSH connectivity using the installer this check should be omitted as it will always fail. If you desire to setup SSH connectivity manually, then once it is done you can run the "runcluvfy.sh" with the following command.
/mountpoint/clusterware/runcluvfy.sh stage -pre crsinst -n ol7-122-rac1,ol7-122-rac2 -verbose
If you become any failures be certain to right them earlier proceeding.
The virtual machine setup is at present complete.
Before moving forward you lot should probably shut down your VMs and take snapshots of them. If whatever failures happen beyond this point it is probably better to switch back to those snapshots, make clean upwards the shared drives and start the grid installation again. An culling to cleaning up the shared disks is to back them upwards now using zip and just supervene upon them in the effect of a failure.
$ # Linux $ cd /u04/VirtualBox/ol7-122-rac $ zip PreGrid.zip *.vdi Rem Windows C: cd C:\VirtualBox\ol7-122-rac zip PreGrid.zip *.vdi
Install the Filigree Infrastructure
Make sure both virtual machines are started. The GI is now an image installation, so perform the following on the start node equally the "oracle" user.
export SOFTWARE_LOCATION=/media/sf_12.two.0.1/ cd /u01/app/12.2.0.ane/grid unzip -q $SOFTWARE_LOCATION/linuxx64_12201_grid_home.zip
Install the following parcel from the grid home as the "root" user on all nodes.
su - # Local node. cd /u01/app/12.two.0.1/filigree/cv/rpm rpm -Uvh cvuqdisk* # Remote node. scp ./cvuqdisk* root@ol7-122-rac2:/tmp ssh root@ol7-122-rac2 rpm -Uvh /tmp/cvuqdisk* exit
If you were planning on using the AFD Driver (the new ASMLib) you would configure the shared disks using the asmcmd control as shown beneath. We are using UDEV, so this is not necessary.
# !!!! I did non do this! !!!! su - # Set environment. consign ORACLE_HOME=/u01/app/12.2.0.one/grid export ORACLE_BASE=/tmp # Mark disks. $ORACLE_HOME/bin/asmcmd afd_label DISK1 /dev/oracleasm/asm-disk1 --init $ORACLE_HOME/bin/asmcmd afd_label DISK2 /dev/oracleasm/asm-disk2 --init $ORACLE_HOME/bin/asmcmd afd_label DISK3 /dev/oracleasm/asm-disk3 --init $ORACLE_HOME/bin/asmcmd afd_label DISK4 /dev/oracleasm/asm-disk4 --init # Exam Disks. $ORACLE_HOME//bin/asmcmd afd_lslbl /dev/oracleasm/asm-disk1 $ORACLE_HOME//bin/asmcmd afd_lslbl /dev/oracleasm/asm-disk2 $ORACLE_HOME//bin/asmcmd afd_lslbl /dev/oracleasm/asm-disk3 $ORACLE_HOME//bin/asmcmd afd_lslbl /dev/oracleasm/asm-disk4 # unset environs. unset ORACLE_BASE exit
Configure the Filigree Infrastructure by running the following as the "oracle" user.
I could have run the configuration in silent fashion using this edited response file (grid_config.rsp) with the following command.
cd /u01/app/12.2.0.ane/filigree ./gridSetup.sh -silent -responseFile /tmp/grid_config.rsp
Instead, here's the interactive configuration.
cd /u01/app/12.2.0.1/grid ./gridSetup.sh
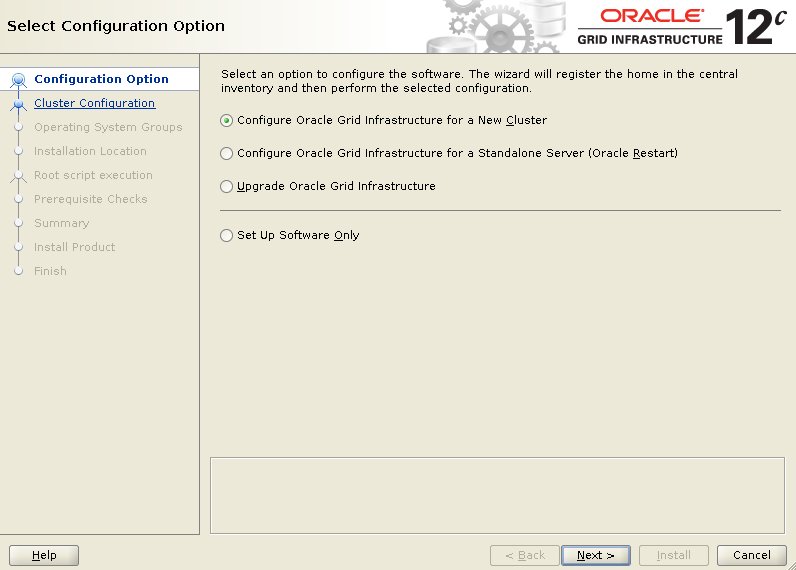
Select the "Configure Oracle Grid Infrastructure for a New Cluster" choice, then click the "Adjacent" push button.
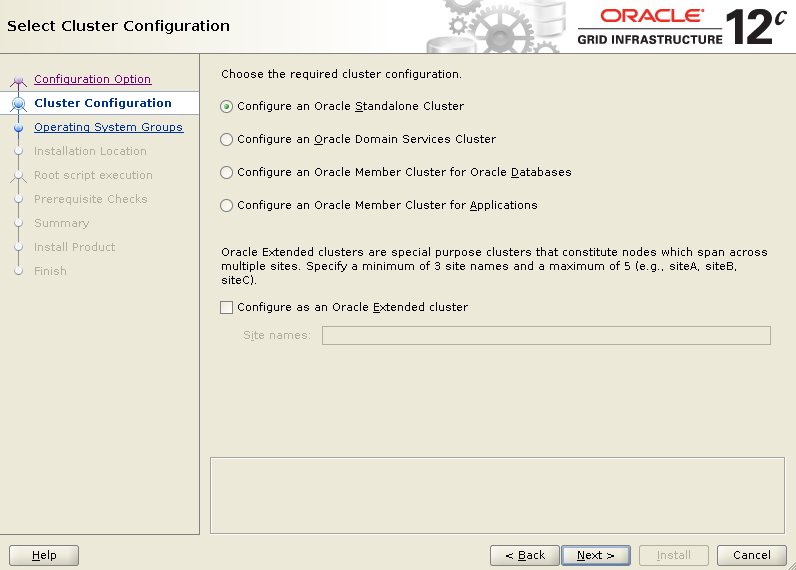
Accept the "Configure an Oracle Standalone Cluster" pick past clicking the "Next" button.
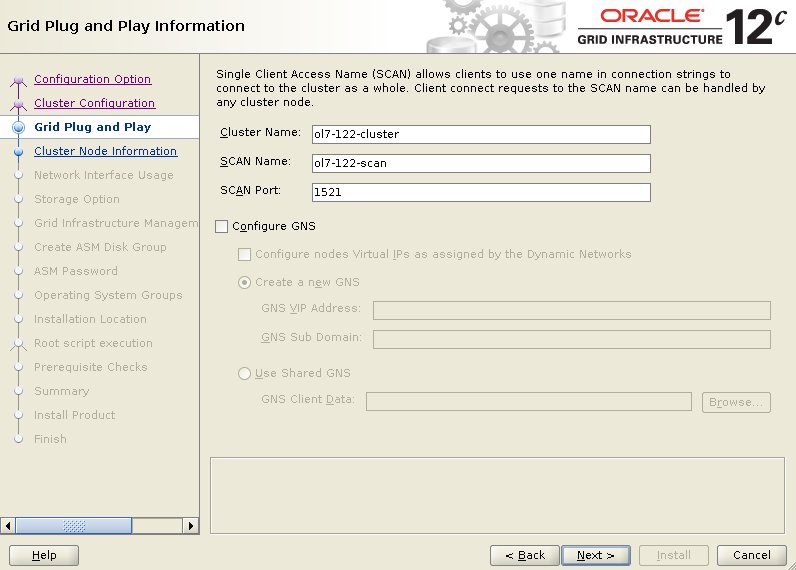
Enter the cluster name "ol7-122-cluster", SCAN name "ol7-122-browse" and Scan port "1521", then click the "Next" button.
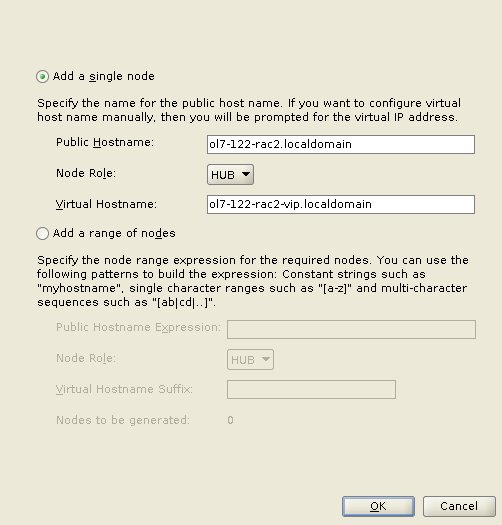
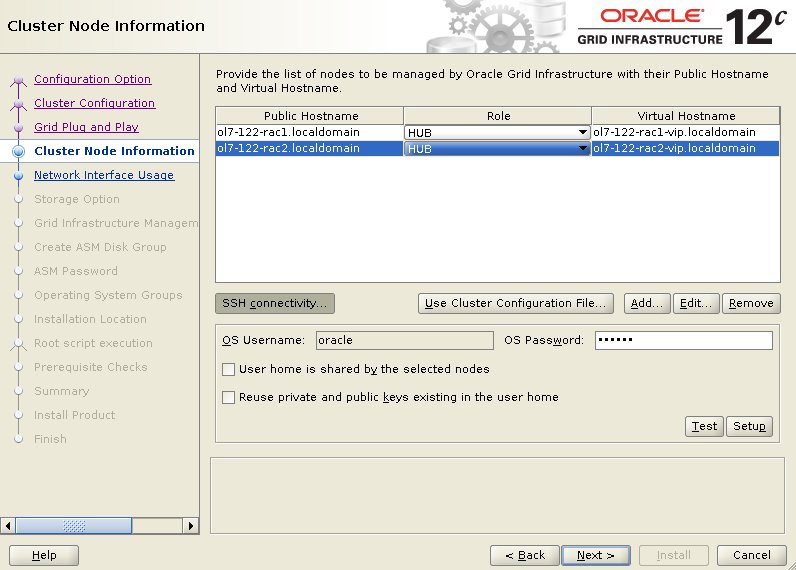
On the "Cluster Node Information" screen, click the "Add" button.
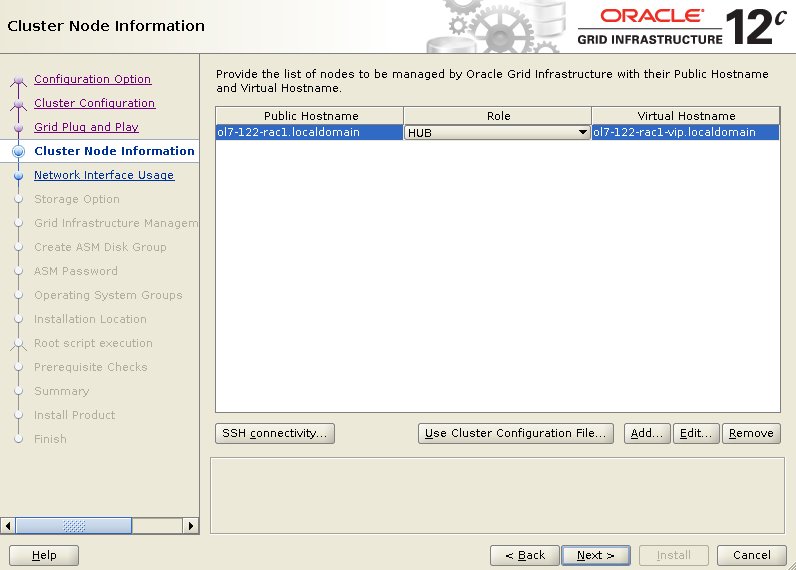
Enter the details of the second node in the cluster, then click the "OK" push.
Click the "SSH connectivity..." push and enter the password for the "oracle" user. Click the "Setup" push to configure SSH connectivity, and the "Test" button to examination it in one case it is complete. Once the test is complete, click the "Next" button.
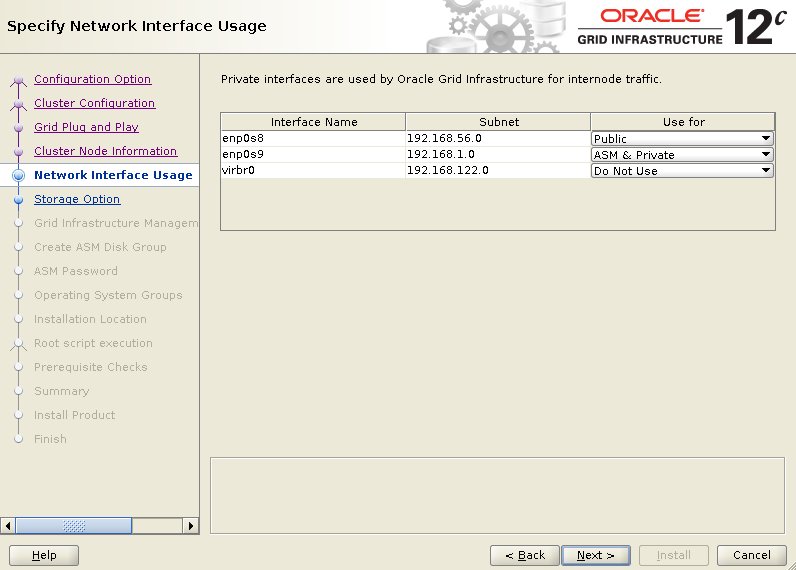
Bank check the public and individual networks are specified correctly. If the NAT interface is displayed, remember to mark it as "Practice Not Use". Click the "Next" push.
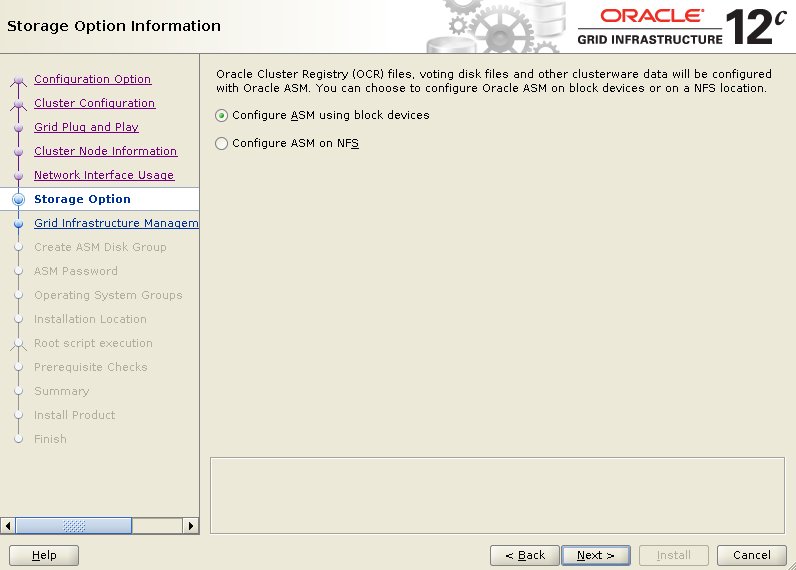
Take the "Configure ASM using block devices" pick by clicking the "Next" push button.
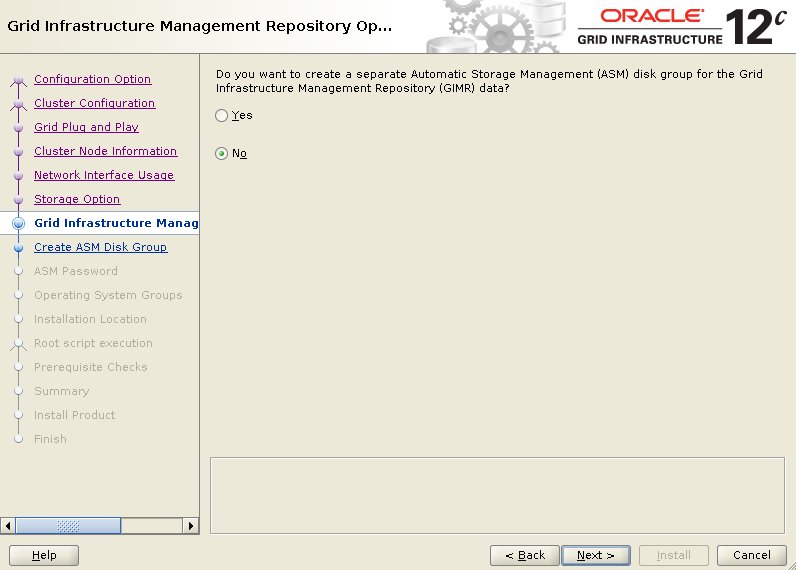
Select the "No" pick, every bit nosotros don't desire to create a separate disk group for the GIMR in this case. Click the "Next" push button.
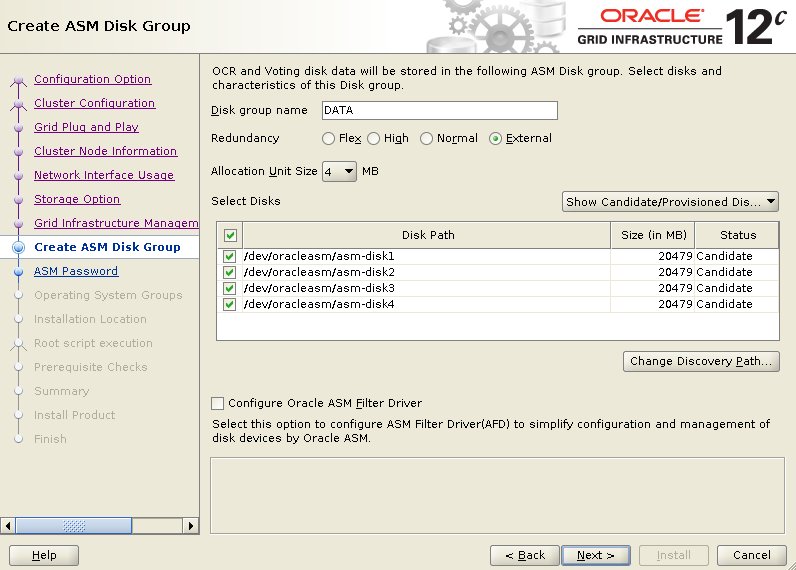
Set the redundancy to "External", click the "Change Discovery Path" button and set the path to "/dev/oracleasm/*". Return to the primary screen and select all 4 disks. Uncheck the "Configure Oracle ASM Filter Commuter" pick, then click the "Side by side" push button.
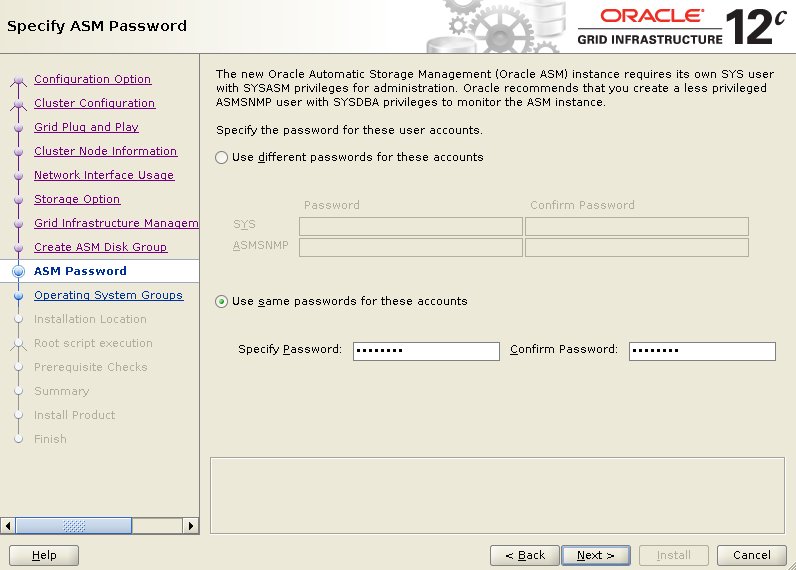
Enter the credentials and click the "Side by side" push button.
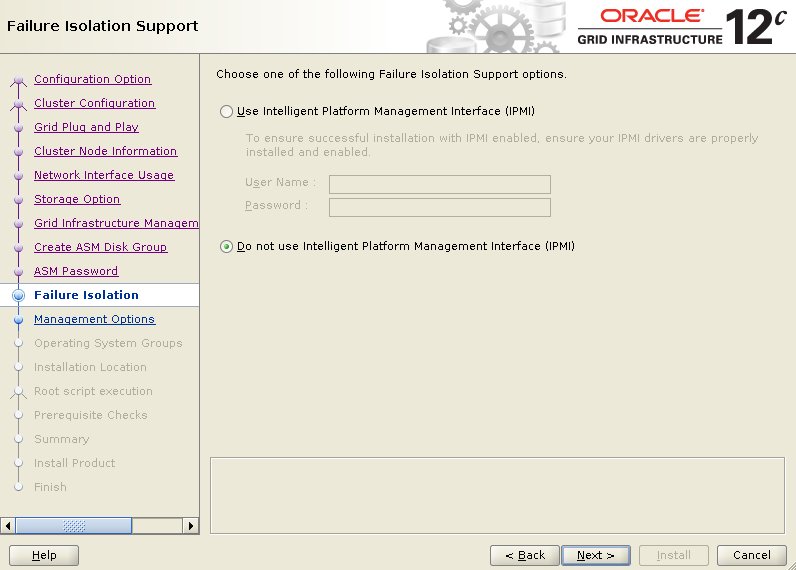
Accept the default IPMI option past clicking the "Next" button.
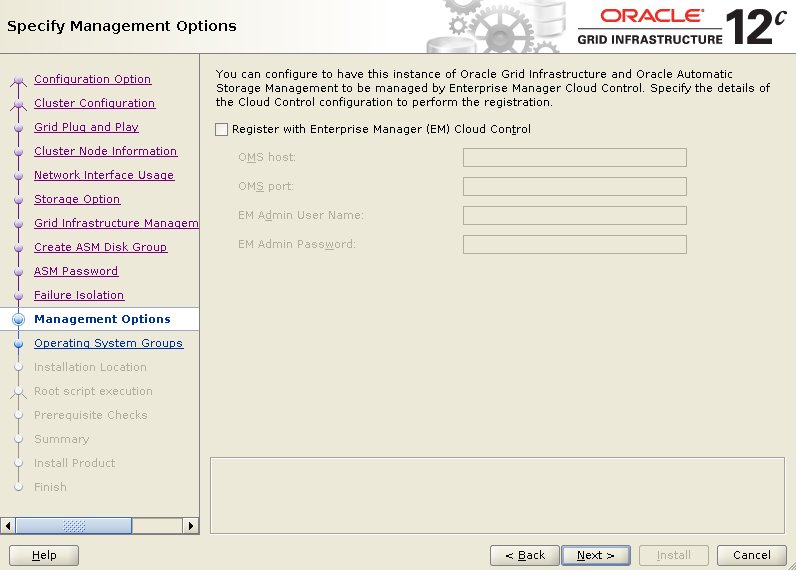
Don't register with EM. Click the "Next" button.
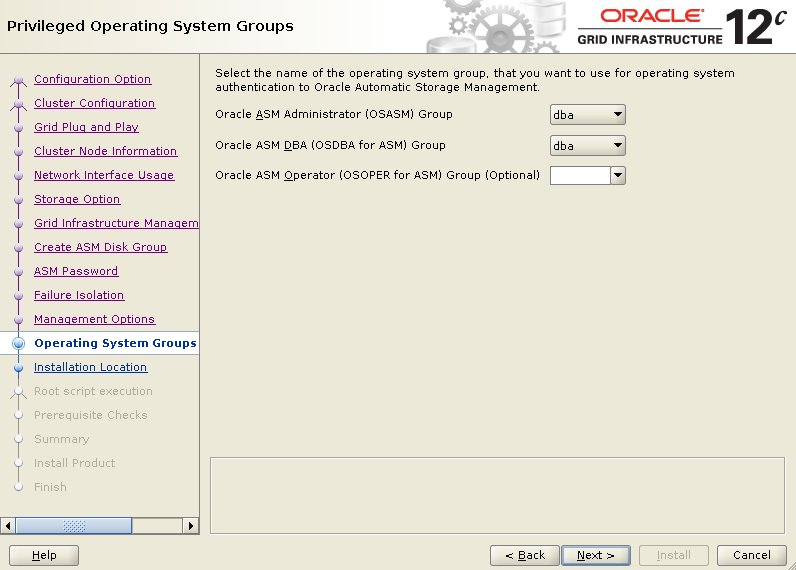
We are using a single user and group manage both ASM add the database, so set the groups to "dba" and click the "Side by side" button. Accept the warnings on the subsequent dialog by clicking the "Yeah" button.
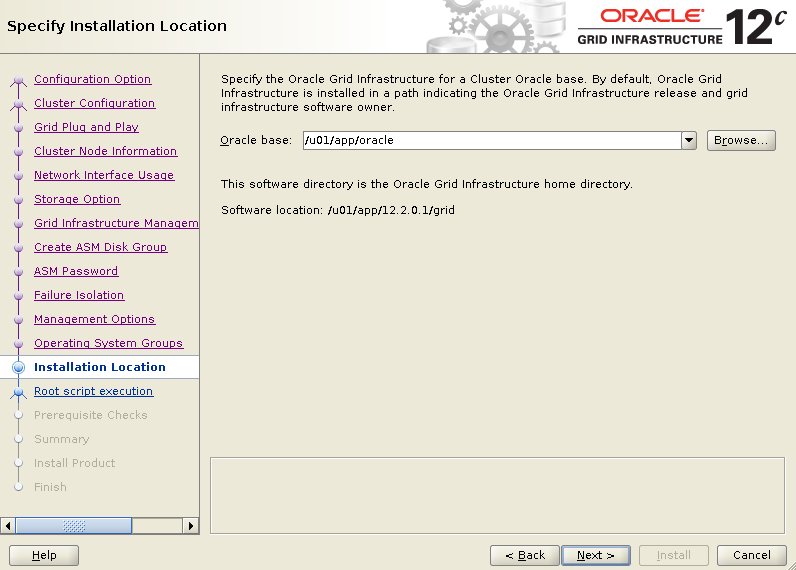
Enter the Oracle Base location "/u01/app/oracle" and click the "Adjacent" button. We take already pre-created directories for the subsequently database installation, so ignore the subsequent alarm nearly the Oracle Base not existence empty past clicking the "Yes" button.
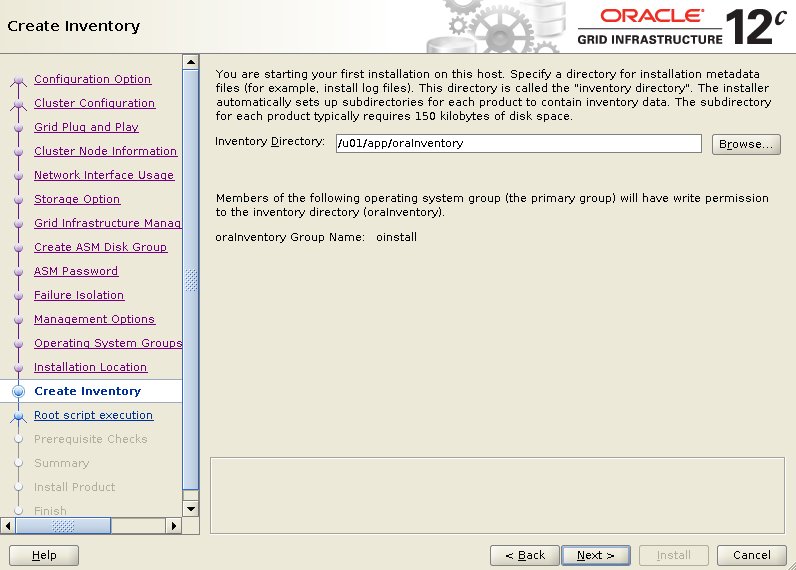
Accept the default inventory directory by clicking the "Side by side" button.
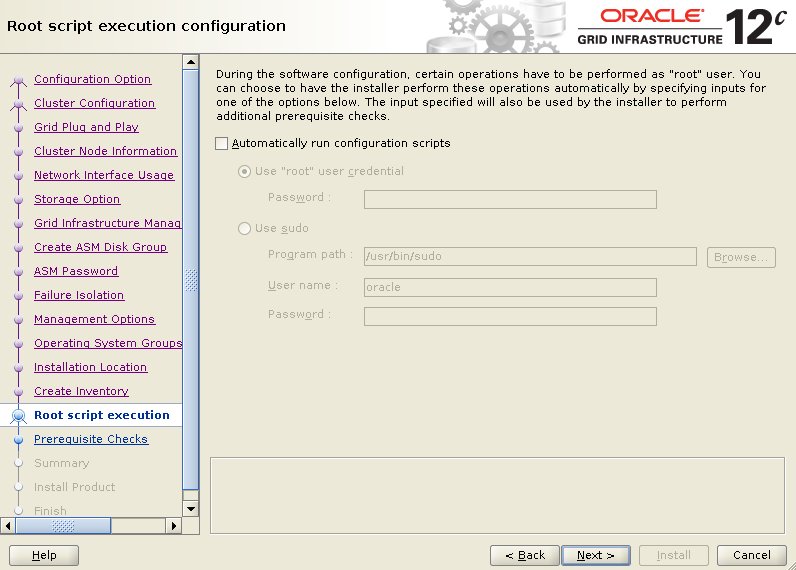
If you want the root scripts to run automatically, enter the relevant credentials. I prefer to run them manually. Click the "Next" push button.
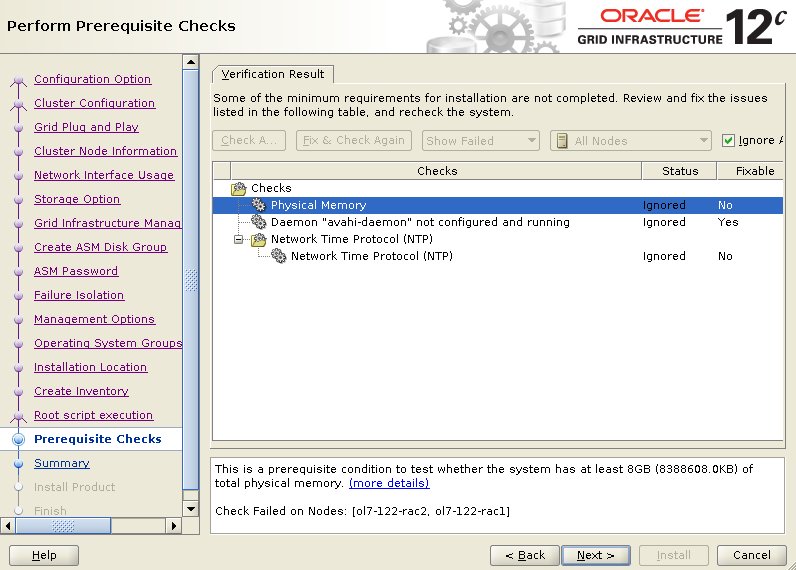
Look while the prerequisite checks complete. If yous have any issues use the "Fix & Check Again" button. Once possible fixes are consummate, check the "Ignore All" checkbox and click the "Next" push button. Information technology is likely the "Physical Retentiveness" and "Network Time Protocol (NTP)" tests will neglect for this type of installation. This is OK.
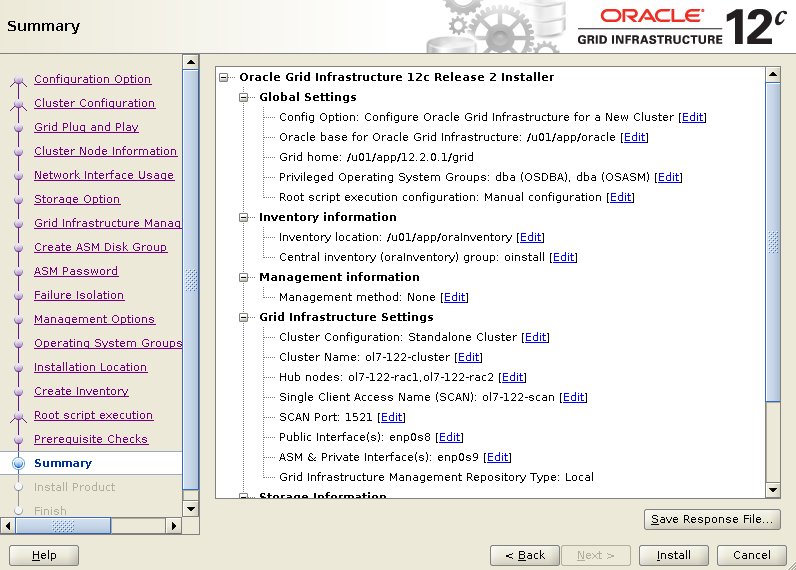
If you are happy with the summary information, click the "Install" button.
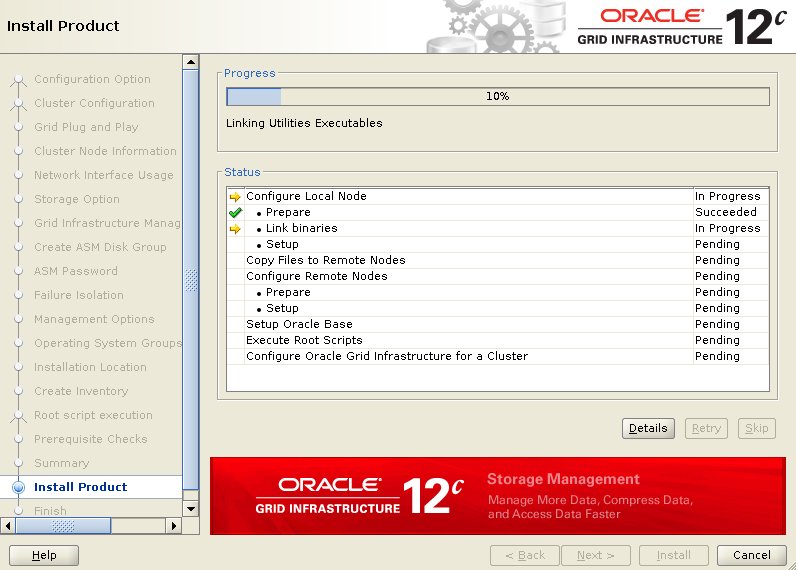
Wait while the installation takes place.
When prompted, run the configuration scripts on each node.
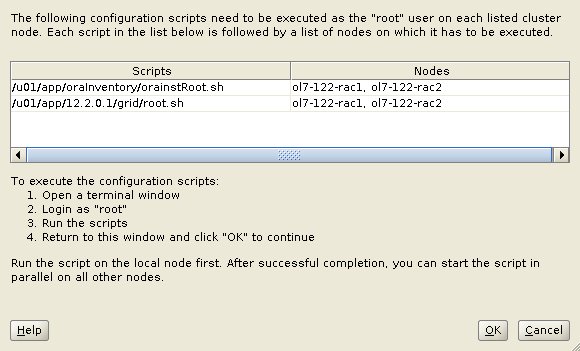
The output from the "orainstRoot.sh" file should look something like that listed beneath.
# /u01/app/oraInventory/orainstRoot.sh Irresolute permissions of /u01/app/oraInventory. Adding read,write permissions for group. Removing read,write,execute permissions for world. Changing groupname of /u01/app/oraInventory to oinstall. The execution of the script is complete. #
The output of the "root.sh" will vary a niggling depending on the node it is run on. Example output can be seen hither (Node1, Node2).
Once the scripts take completed, return to the "Execute Configuration Scripts" screen on "ol7-122-rac1" and click the "OK" button.
Wait for the configuration assistants to complete.
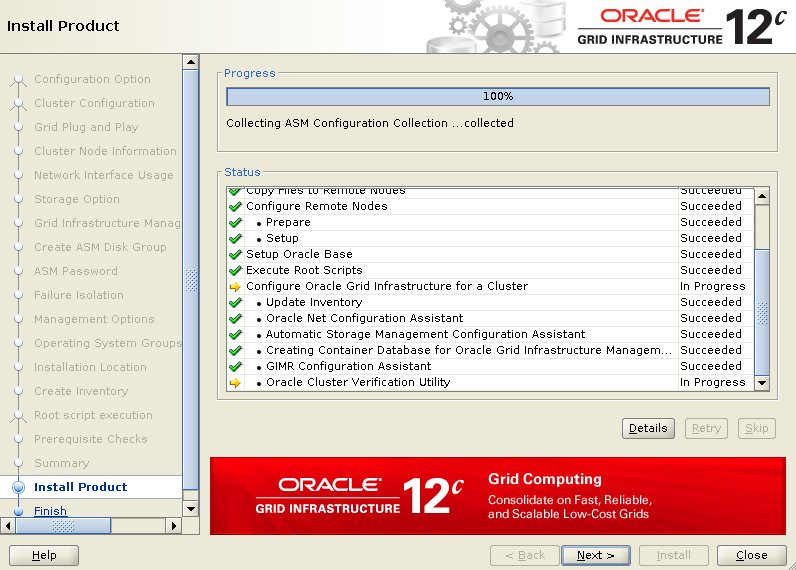
If any of the configuration steps fail you lot should check the specified log to see if the fault is a testify-stopper or not. The only error I received was for fourth dimension sychronization (PRVG-13606. .
PRVG-13606 : chrony daemon is not synchronized with whatsoever external fourth dimension source on node ...
Provided you don't have any show-stoppers, information technology is rubber to ignore the errors by clicking "Next" push.
Click the "Close" button to exit the installer.
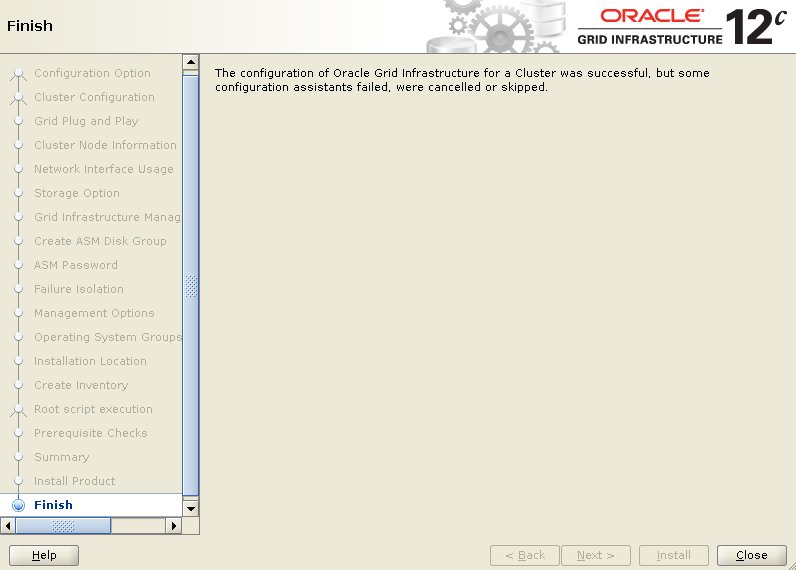
The grid infrastructure installation is at present consummate. We tin can cheque the status of the installation using the following commands.
$ grid_env $ crsctl stat res -t -------------------------------------------------------------------------------- Name Target Country Server Land details -------------------------------------------------------------------------------- Local Resource -------------------------------------------------------------------------------- ora.ASMNET1LSNR_ASM.lsnr ONLINE ONLINE ol7-122-rac1 STABLE ONLINE ONLINE ol7-122-rac2 STABLE ora.DATA.dg ONLINE ONLINE ol7-122-rac1 STABLE ONLINE ONLINE ol7-122-rac2 STABLE ora.LISTENER.lsnr ONLINE ONLINE ol7-122-rac1 STABLE ONLINE ONLINE ol7-122-rac2 STABLE ora.chad ONLINE ONLINE ol7-122-rac1 STABLE ONLINE ONLINE ol7-122-rac2 STABLE ora.net1.network ONLINE ONLINE ol7-122-rac1 STABLE ONLINE ONLINE ol7-122-rac2 STABLE ora.ons ONLINE ONLINE ol7-122-rac1 STABLE ONLINE ONLINE ol7-122-rac2 STABLE ora.proxy_advm OFFLINE OFFLINE ol7-122-rac1 STABLE OFFLINE OFFLINE ol7-122-rac2 STABLE -------------------------------------------------------------------------------- Cluster Resources -------------------------------------------------------------------------------- ora.LISTENER_SCAN1.lsnr 1 ONLINE ONLINE ol7-122-rac2 STABLE ora.LISTENER_SCAN2.lsnr 1 ONLINE ONLINE ol7-122-rac2 STABLE ora.LISTENER_SCAN3.lsnr i ONLINE ONLINE ol7-122-rac2 STABLE ora.MGMTLSNR 1 ONLINE ONLINE ol7-122-rac2 169.254.137.110 192. 168.1.102,STABLE ora.asm 1 ONLINE ONLINE ol7-122-rac1 Started,STABLE 2 ONLINE ONLINE ol7-122-rac2 Started,STABLE three OFFLINE OFFLINE STABLE ora.cvu 1 ONLINE ONLINE ol7-122-rac1 STABLE ora.mgmtdb 1 ONLINE ONLINE ol7-122-rac2 Open up,STABLE ora.ol7-122-rac1.vip i ONLINE ONLINE ol7-122-rac1 STABLE ora.ol7-122-rac2.vip i ONLINE ONLINE ol7-122-rac2 STABLE ora.qosmserver i ONLINE ONLINE ol7-122-rac1 STABLE ora.scan1.vip one ONLINE ONLINE ol7-122-rac2 STABLE ora.scan2.vip i ONLINE ONLINE ol7-122-rac2 STABLE ora.scan3.vip ane ONLINE ONLINE ol7-122-rac2 STABLE -------------------------------------------------------------------------------- $
At this bespeak it is probably a good idea to shutdown both VMs and take snapshots. Call back to make a fresh null of the ASM disks on the host machine, which you lot will need to restore if you lot revert to the post-filigree snapshots.
$ cd /u04/VirtualBox/ol7-122-rac $ nada PostGrid.zip *.vdi
Install the Database Software
Brand sure the "ol7-122-rac1" and "ol7-122-rac2" virtual machines are started, so login to "ol7-122-rac1" as the oracle user and start the Oracle installer. Bank check that all services are upwards using "crsctl stat res -t", every bit described earlier.
I could have run the OUI in silent mode using this edited response file (db_install.rsp) with the post-obit command.
$ db_env $ cd /media/sf_12.2.0.1/database $ ./runInstaller -silent -ignoreSysPrereqs -showProgress -responseFile /tmp/db_install.rsp
Instead, hither's the interactive view.
$ db_env $ cd /media/sf_12.2.0.1/database $ ./runInstaller
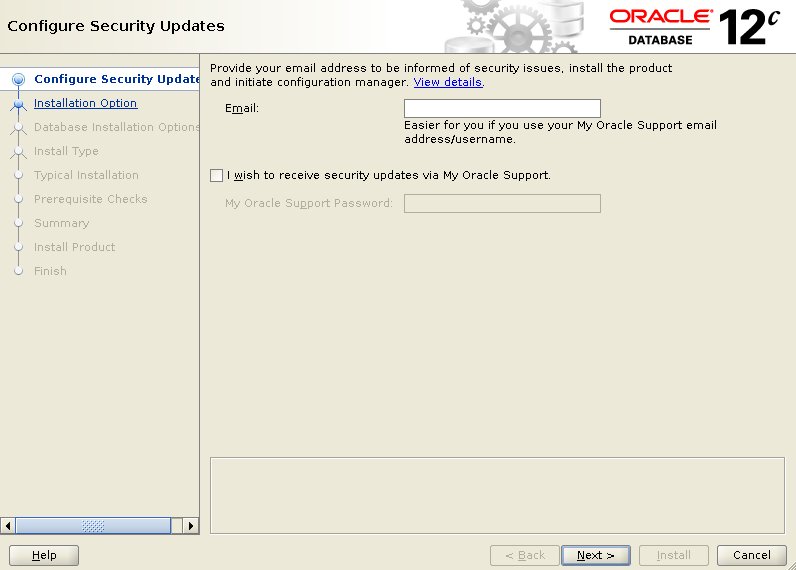
Uncheck the security updates checkbox and click the "Side by side" push and "Yes" on the subsequent warning dialog.
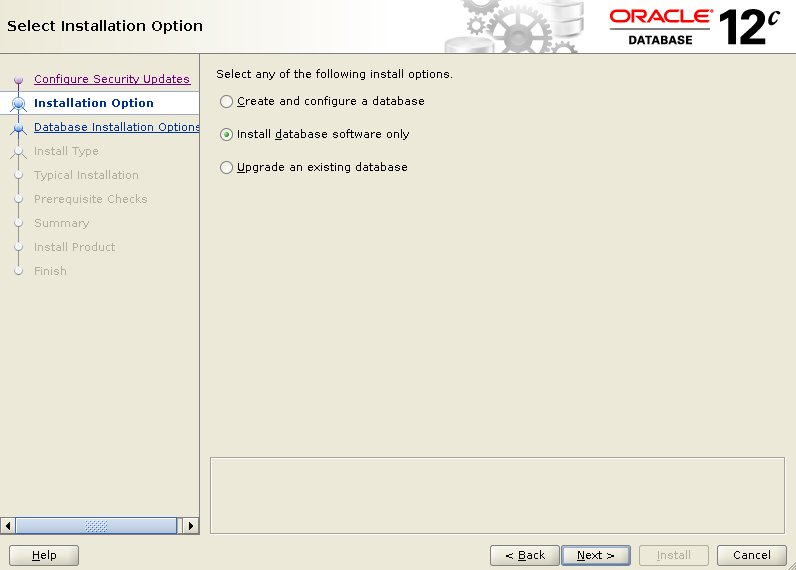
Select the "Install database software only" option, then click the "Next" button.
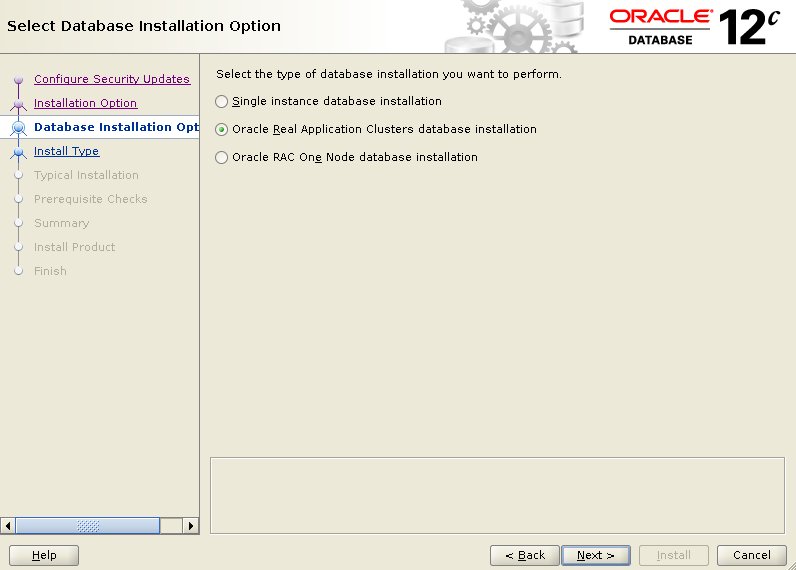
Accept the "Oracle Real Application Clusters database installation" option by clicking the "Next" button.
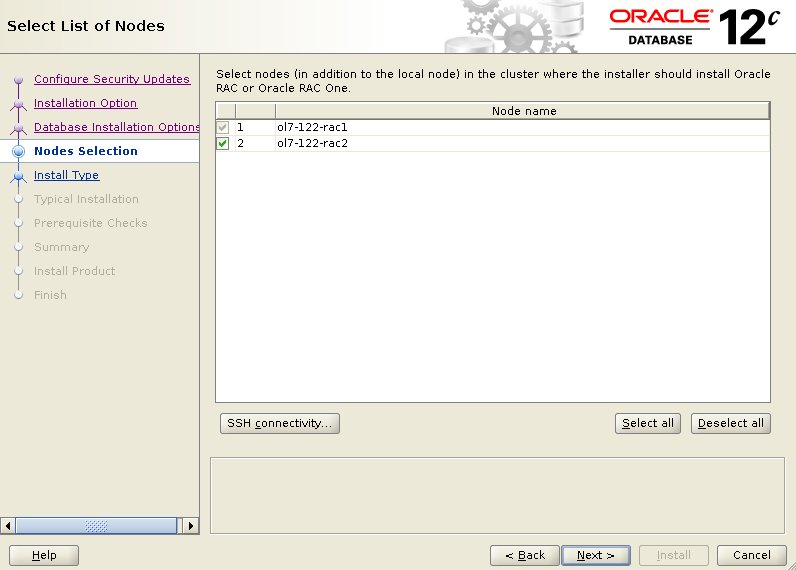
Make sure both nodes are selected, then click the "Next" button.
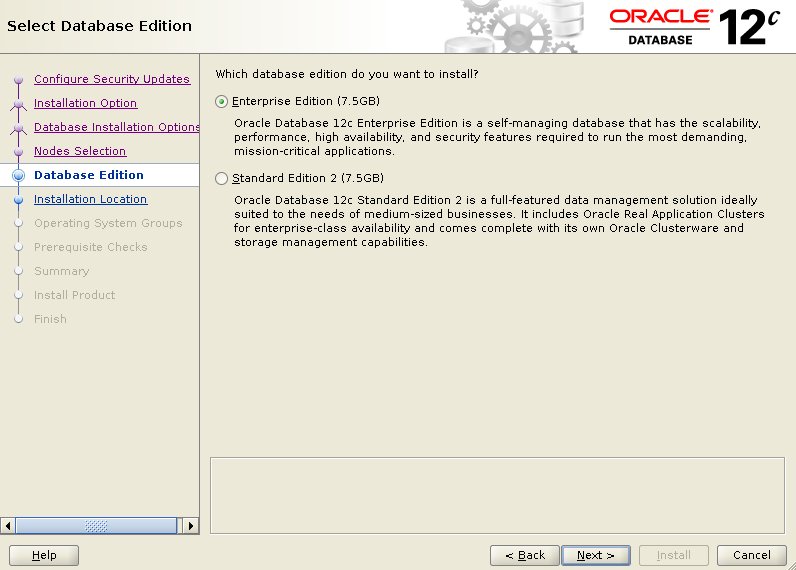
Select the "Enterprise Edition" option, then click the "Next" button.
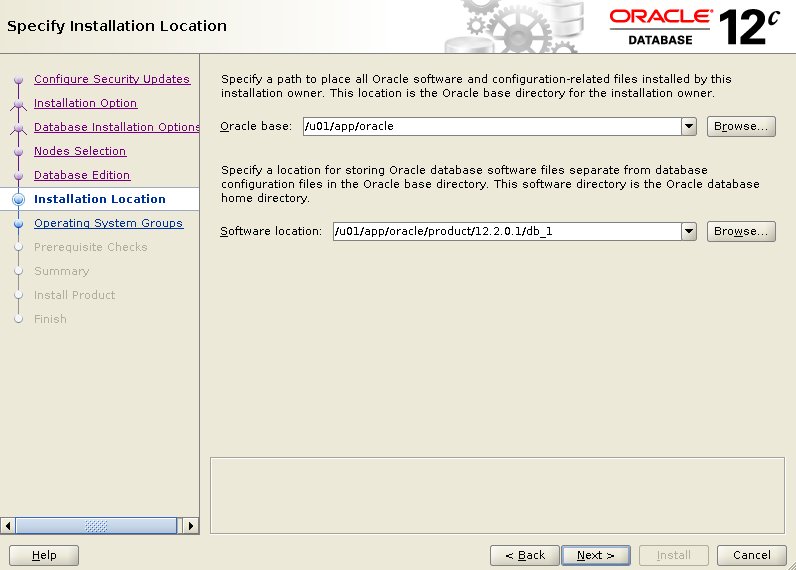
Enter "/u01/app/oracle" as the Oracle base and "/u01/app/oracle/product/12.2.0.1/db_1" as the software location, and then click the "Next" button.
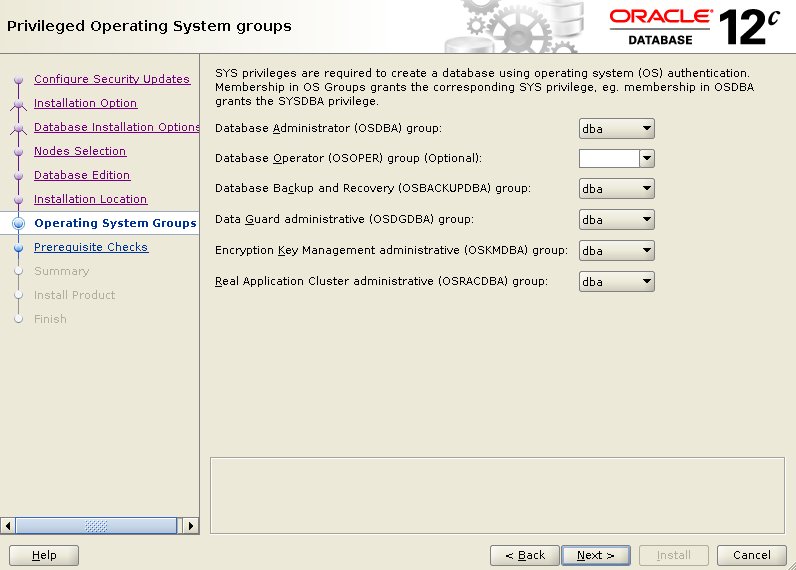
Select the desired operating system groups, then click the "Adjacent" button. In this case nosotros are simply using the "dba" group.
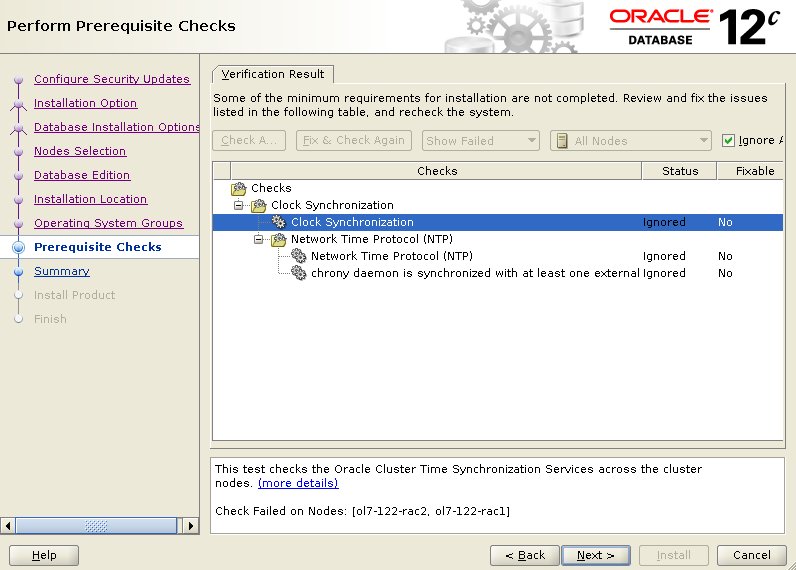
Wait for the prerequisite check to complete. If at that place are any issues either click the "Fix & Check Again" button, or check the "Ignore All" checkbox and click the "Next" button.
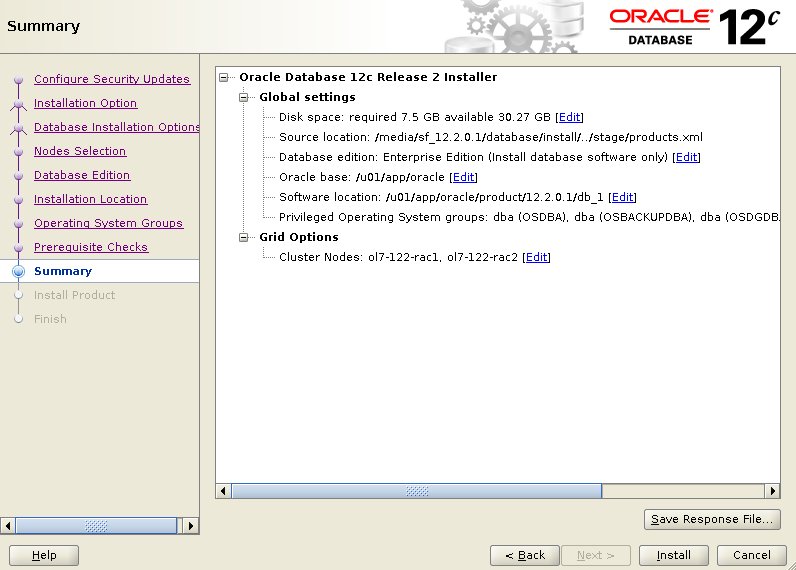
If you lot are happy with the summary information, click the "Install" button.
Look while the installation takes place.
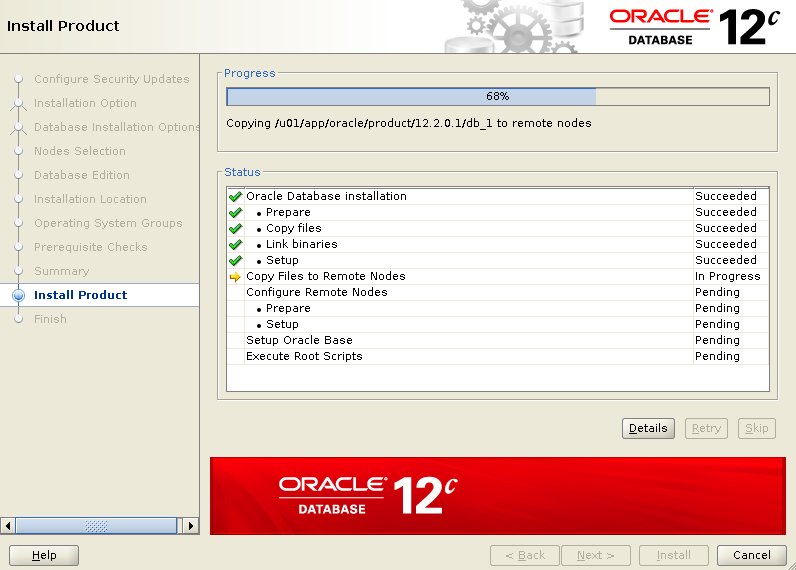
When prompted, run the configuration script on each node. When the scripts have been run on each node, click the "OK" push button.

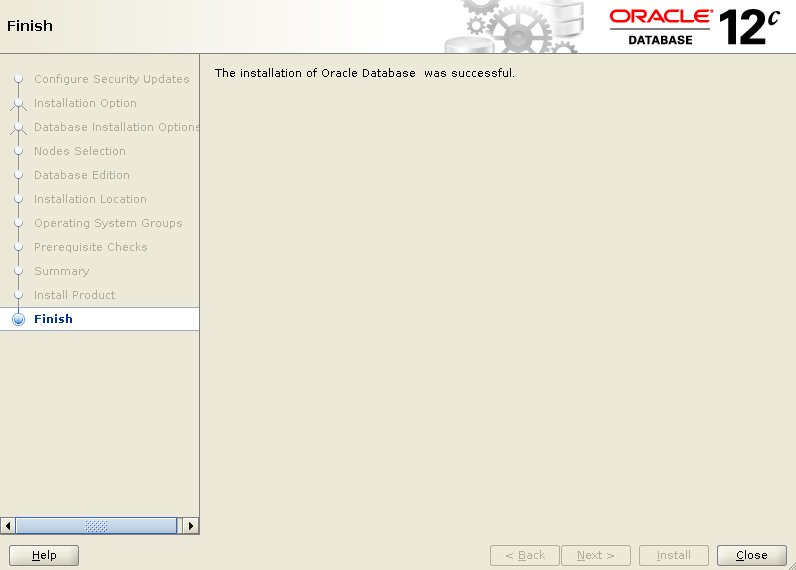
Click the "Close" push button to go out the installer.
Shutdown both VMs and take snapshots. Retrieve to make a fresh zip of the ASM disks on the host car, which you volition demand to restore if you revert to the mail service-db snapshots.
$ cd /u04/VirtualBox/ol7-122-rac $ zippo PostDB.nada *.vdi
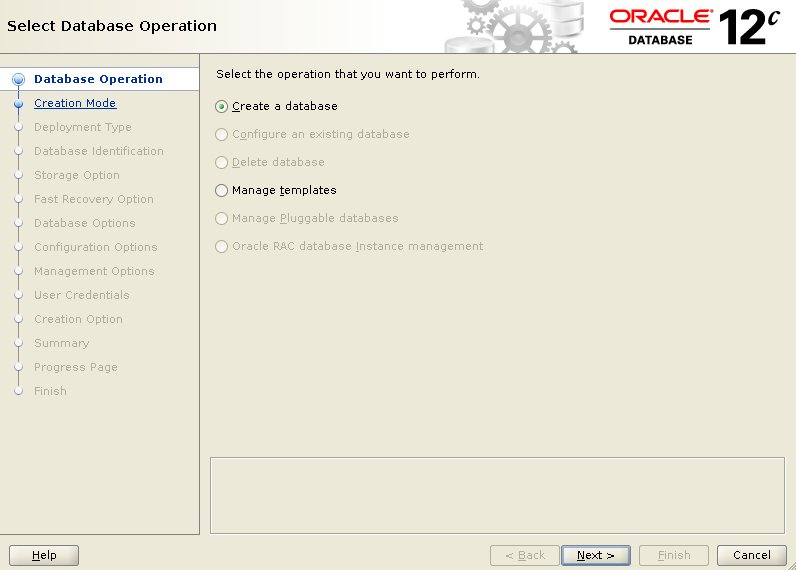
Create a Database
Make certain the "ol7-122-rac1" and "ol7-122-rac2" virtual machines are started, then login to "ol7-122-rac1" as the oracle user and start the Database Creation Asistant (DBCA).
I could have run the DBCA in silent fashion using this edited response file (dbca.rsp) with the following command.
db_env dbca -silent -responseFile /tmp/dbca.rsp
Instead, here'southward the interactive view.
$ db_env $ dbca
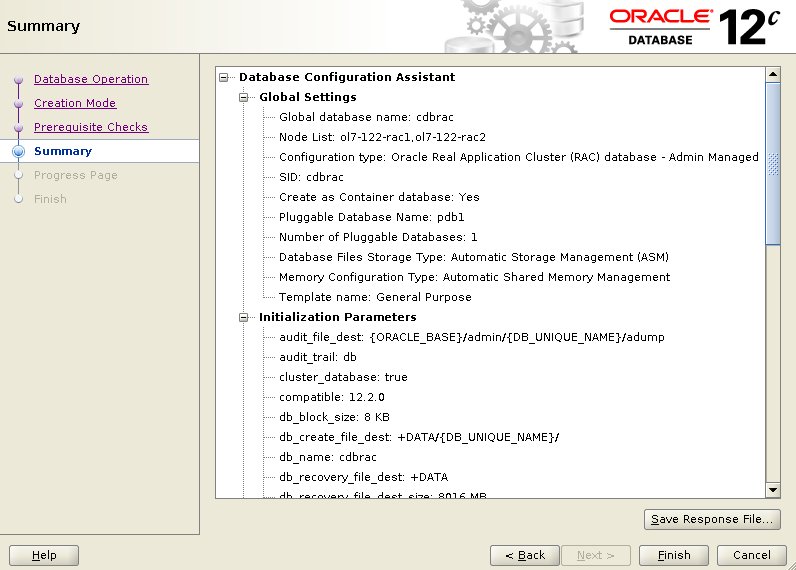
Select the "Create Database" option and click the "Next" button.
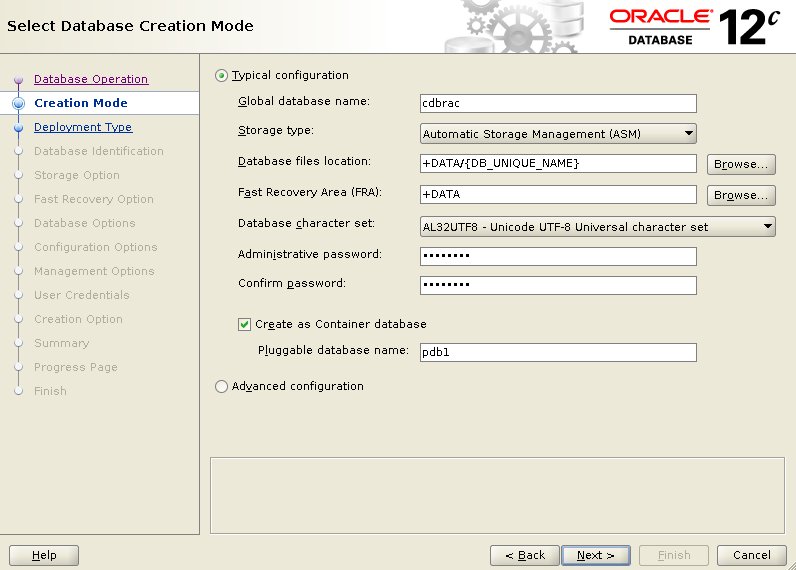
Select the "Typical configuration" choice. Enter the container database name (cdbrac), pluggable database name (pdb1) and administrator password. Click the "Next" push button.
Wait for the prerequisite checks to complete. If there are any problems either gear up them, or bank check the "Ignore All" checkbox and click the "Next" button. If there are no problems you lot will go directly to the summary screen.
If you are happy with the summary information, click the "Finish" button.
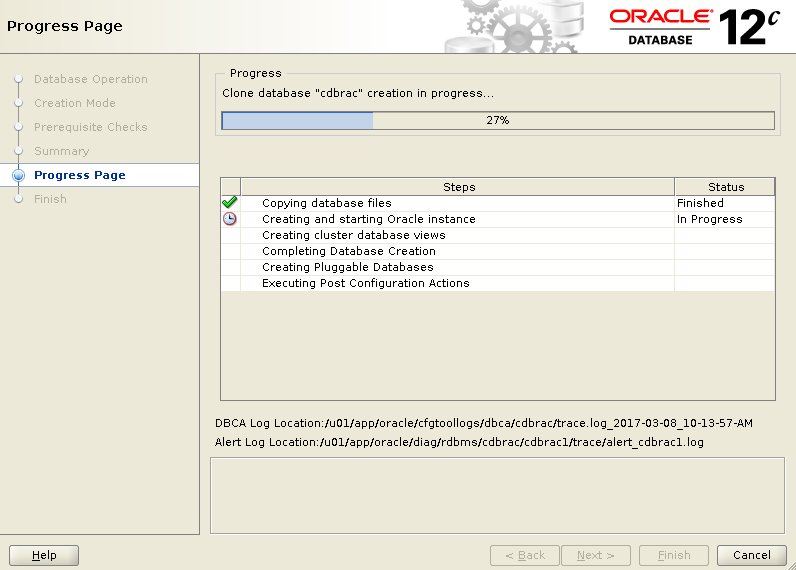
Wait while the database creation takes place.
If you lot desire to modify passwords, click the "Password Direction" push button. When finished, click the "Close" push button.
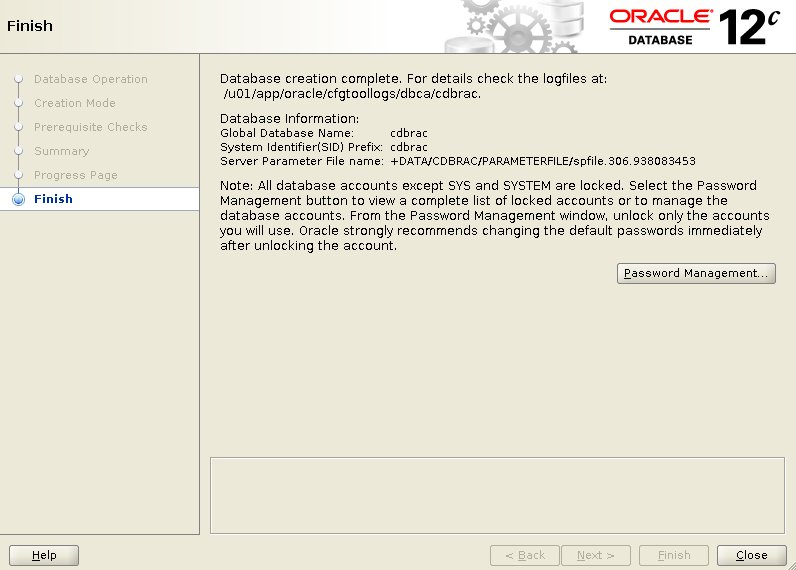
The RAC database creation is now complete.
Check the Status of the RAC
There are several ways to check the condition of the RAC. The srvctl utility shows the current configuration and status of the RAC database.
$ srvctl config database -d cdbrac Database unique proper name: cdbrac Database name: cdbrac Oracle home: /u01/app/oracle/product/12.2.0.ane/db_1 Oracle user: oracle Spfile: +DATA/CDBRAC/PARAMETERFILE/spfile.306.938083453 Password file: +DATA/CDBRAC/Password/pwdcdbrac.285.938081999 Domain: Kickoff options: open up Stop options: immediate Database role: Main Direction policy: AUTOMATIC Server pools: Deejay Groups: DATA Mount indicate paths: Services: Type: RAC Start concurrency: End concurrency: OSDBA grouping: dba OSOPER group: Database instances: cdbrac1,cdbrac2 Configured nodes: ol7-122-rac1,ol7-122-rac2 CSS critical: no CPU count: 0 Memory target: 0 Maximum retentiveness: 0 Default network number for database services: Database is administrator managed $ $ srvctl status database -d cdbrac Instance cdbrac1 is running on node ol7-122-rac1 Case cdbrac2 is running on node ol7-122-rac2 $
The V$ACTIVE_INSTANCES view can also display the current status of the instances.
$ sqlplus / equally sysdba SQL*Plus: Release 12.two.0.1.0 Production on Wed Mar 8 11:04:42 2017 Copyright (c) 1982, 2016, Oracle. All rights reserved. Connected to: Oracle Database 12c Enterprise Edition Release 12.ii.0.ane.0 - 64bit Production SQL> SELECT inst_name FROM five$active_instances; INST_NAME -------------------------------------------------------------------------------- ol7-122-rac1.localdomain:cdbrac1 ol7-122-rac2.localdomain:cdbrac2 SQL>
For more information run across:
- Oracle Filigree Infrastructure Installation Guide 12c Release 2 (12.2) for Linux
- Oracle Real Application Clusters Installation Guide 12c Release ii (12.2) for Linux and UNIX
- Oracle Database Installation Guide 12c Release 2 (12.2) for Linux
- All RAC Articles
- Oracle Database 12c Release two (12.two) RAC On Oracle Linux 6 Using VirtualBox
Hope this helps. Regards Tim...
Back to the Height.
Source: https://oracle-base.com/articles/12c/oracle-db-12cr2-rac-installation-on-oracle-linux-7-using-virtualbox
0 Response to "Virtualbox Could Not Read From Boot Medium Windows 98"
Enregistrer un commentaire